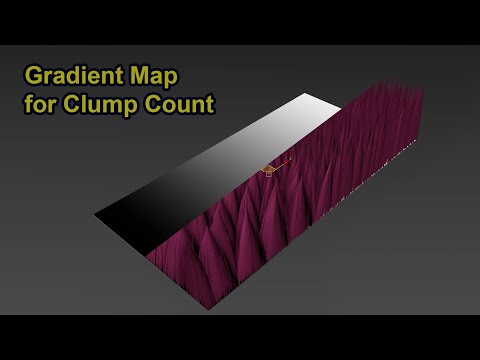
I am tring to have varying degrees of clustering happening using a gradient from top to bottom. I saw that clustering needs surface dependence data. I added Ox Generate Guide Data but i cannot seem to get it to work. there is not muchb info out there on this |
| Hi, Are you using the Cluster modifier? if so, that's deprecated. Use the Clump modifier instead. Yes. To make clumps and use textures on the modifiers, Ornatrix needs surface dependency data.
That just means that the hair roots should be grounded to a polygon mesh.
This is needed in cases when the hair is generated from spline curves or polygon strips.Use the Ground Strands modifier to ground the hair roots to a mesh, creating the surface dependency data for clumping and other things to work as intended. The details about Generate Guide Data Can be found in the documentation but it is not relevant to what you are trying to do. Jeordanis Figuereo (Product Designer. EPHERE Inc.) |
| Thank you, i have started using the Ox Clump but still don't get any good results when using agradient ramp. is there something i am missing? when i hit create it seems to change just a small amound where it is black but nothing else, i though you may be able to have a gradient of clump going from big to small, is this possible? |
| Are you using the gradient map as multiplier map? Jeordanis Figuereo (Product Designer. EPHERE Inc.) |
| I am trying to use a Gradient Ramp (black to white) to get less clumps at the top of some geo and more clumps on the bottom of the geo but none of the slots I put the Gradient Ramp in seem to do this |
| The Amount parameter in the Clump modifier has a slot to connect a map. That is the multiplier map slot. Did you try that? Jeordanis Figuereo (Product Designer. EPHERE Inc.) |
| Yes i have, that option controls the amount a clump is formed, i am trying to get a higher density of clumps in certain regions of the groom based on a gradient ramp. is that possible?
Thanks |
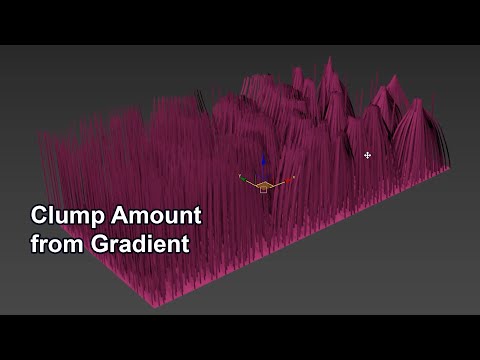
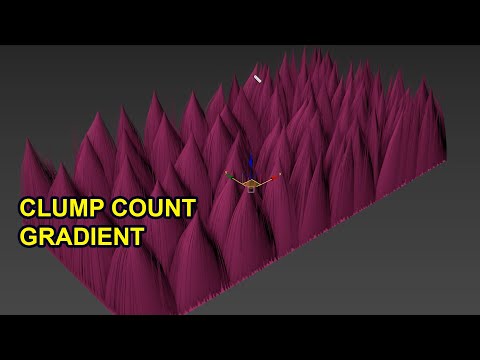
| Oh I understand now. The Clump Amount and Clump Count are different things. Clump amount is how much the hair is clumped, like the strength of the clump. This one can be controlled with a texture map. Clump Count is the amount of clumps overall in the hair object. This one cannot be controlled with a multiplier map. Jeordanis Figuereo (Product Designer. EPHERE Inc.) |
| Could it be done if i added it to the feature requests? how would you get non uniform clumps usually? |
| Non unifrom clumps can be created withnthe default settings and just generating random clumps. They are random by default. One way to control the clump count using a texture map is using the external clump method: - Generate a second hair object,
- Use a map for root distribution in Guides from Surface/Mesh,
- Use the Clump modifier in the first object and connect it to the second object as external guides,
- Generate the clumps.
Jeordanis Figuereo (Product Designer. EPHERE Inc.) |
| Ok i will give that a try, thank you. I understand the clumping is random all over, but would be possible to add some control via a map to gain more control? |
| Hey @ldotchopz
Charly here  Jeordanis wrote an excellent manual, and I will try to record some videos with instructions. Hope this is still up to date and helpful. Jeordanis wrote an excellent manual, and I will try to record some videos with instructions. Hope this is still up to date and helpful.  Need some time to do this. Btw, you can control clumping by GenerateStrandData + SurfaceComb Sinks Data. Need some time to do this. Btw, you can control clumping by GenerateStrandData + SurfaceComb Sinks Data.
Thank you and have a great day
Best regards,
Andrew. ___
I'm 3D grooming Artist since 2016 My portfolio YOUTUBE |
| That would be awesome, thanks! I am already a subscriber to your channel. |
| Hey @ldotchopz
That would be awesome, thanks! I am already a subscriber to your channel.
I'm glad.
Btw, First video already uploaded on the channel
Video: 
Timing:
0:00 - I'm showing this using a regular plane as an example, but you can use a more complex geometry or character. Apply Furball to it. 0:06 - Adjust the ChangeWidth for the viewport so you can see everything properly. You can always adjust it for rendering.
0:15 - Apply the Ox Surface Comb modifier.
0:19 - Turn on the Strand Data option immediately - this will create a channel that we will use in the Clump Amount.
0:24 - Turn off the Strand Data Absolute Sink Size option, I find it works much better without it.
0:30 - Also turn on Affect Whole Strand to activate the effect on length and so on. See the documentation for more details.
0:36 - Go to Sinks to start creating them.
0:37 - Make sure you check Sink Length to see the length of the sinks. Even though it's not that important, it's more convenient for me.
0:41 - Create sinks from smaller to larger - this is a gradient. Make the gradient in the direction you want it to go. The smaller the sink, the less the effect of Amount in Clump will be.
0:50 - Let's start by setting the length multiplier. Note - The actual length of the sink can only be set using the viewport UI (drag the sink tip). The multiplier is then used to adjust it internally for whatever purpose you need. You can create even more sinks for a smooth gradient and more control, then the length multiplier for the first sink can be set to 0.1 instead of 0.2. Don't be afraid to experiment.
1:23 - Okay, we have the gradient. We can turn off the visual display since we don't want to influence the length, shape, and direction. We create a simple channel.
1:34 - Turning the Hair visualization on
1:36 - Applying a clump
1:42 - In the No Channel slot, we load our channel from the Surface Comb. By default it is named SinkValues. You can change the name in the SurfaceComb Settings - for convenience.
1:49 - We end up with the desired result. Clump Amount fades smoothly along the gradient. Have fun
2nd video coming soon.
Thank you and have a great day
Best regards,
Andrew. ___
I'm 3D grooming Artist since 2016 My portfolio YOUTUBE |
| Video about how to control Clump count with parametric mask from Surface Comb Strand Data 
TIMING: 0:00 - Picking up where we left off in the previous lesson
0:03 - Creating an additional Furball that I will use as a procedural guide for Clump
0:07 - Remove the ChangeWidth modifier as we don't need it.
0:14 - Go back to the previous Ornatrix object from the previous lesson and copy the Ox Surface Comb modifier. We already applied a procedural gradient to the channel.
0:23 - Select our new object, choose Edit Guides and add the Surface Comb modifier above. As a result - we get a channel that can be used in Clump.
0:34 - The Mode should definitely be Sink Size.
0:39 - Change the channel name for convenience.
0:44 - Enable HairFromGuides
0:54 - Temporarily change the generation method to guides as hair. It's more convenient for me. But you don't need to do this step.
1:01 - Change the hair to guides using the "Guides from Hair" modifier. Because these are the guides we need for the external clumps.
1:07 - In Distribution Channel, select the channel we created in SurfaceComb. In my case it is called GuidesGEN. Don't worry about the other channels. We don't need them.
1:21 - It may look like nothing is working, and it is. Because you need to change the generation method to something else. For example, Uniform.
1:33 - Everything is working now. I'll tell you right now - it's not perfect. The developers know and are thinking about how to improve it, but already you have parametric guides thanks to this approach, using a mask that we didn't draw, but created in Surface Comb. That's pretty cool!
1:36 - Now you can control the number of them in Root Count. And we can see that the gradient is working, but not perfectly. We'll fix that manually a little bit later.
1:46 - Let's rename our new guide object to GUIDES CLUMP. Again - this is for convenience. You can name it whatever you want.
1:52 - Selecting the main object. We remove the Surface Comb modifier from the last lesson. We don't need it anymore.
1:58 - Go to Clump and select External Clump Strands. Click on the slot with the same name and add our GUIDES CLUMP object.
2:16 - Click Create to create a clump through its guides. We end up with a series of clumps controlled by a parametric gradient from the Surface Comb. Pretty cool, right?
2:32 - Using Root Count, we change the number of guides, which affects the number of clumps. Note that this is not visually updated (hopefully they'll fix this in the future).
2:39 - So you have to go to the Clump modifier and click Create again after changing the number.
2:43 - As you can see - it all works.
3:00 - Now I will show you how to add additional guides if there are not enough. Only do this if you are 100% sure that you are not going to change the number of guides.
3:05 - Inside the GUIDE CLUPS object, create an additional Edit Guide.
3:12 - Select Brush mode and create a brush. With this brush, Ornatrix will allow you to create interpolated guides. You can watch this tutorial on this topic - https://www.youtube.com/watch?v=Gg5LEQscwvs&t=1s.
3:16 - Choose Position = Center, this is so that when you click on an object - a guide will be created, not a random number.
3:19 - Add guides where you want. You can add as many guides as you want. You can move them, rotate them. Whatever you want =) It is already as your imagination desires.
3:40 - Update the clump with Create and get a nicer result. Thats all. Enjoy =)
Thank you and have a great day
Best regards,
Andrew. ___
I'm 3D grooming Artist since 2016 My portfolio YOUTUBE |
| Scenes from 2 tutorials. 3sd max 2024 + Ornatrix v8.0.12.33496 ___
I'm 3D grooming Artist since 2016 My portfolio YOUTUBE |
| Thanks a lot @charlyxxx this is really helpful, i wasn't aware this could be done. and thanks for the files too. |
| Hey @ldotchopz
You're welcome. I'm glad to help. If you have more questions, feel free to ask them in the new topics. If about this topic - then post here. If there are no questions, I think we can close the ticket? =)
And additional video, if you want to draw mask by hand. 
TIMING: 0:00 - Showing the mask I drew earlier. Again, I recommend watching this lesson after the first two.
0:08 - Go to the GUIDES CLUMP object and go to the HairFromGuides modifier.
0:11 - We need to load this gradient into the distribution map. Just drag it into the slot with the material editor as an instance.
0:19 - Next, we need to enable 100% hair viewing in Preview Strands Fraction and choose the generation method that fits. Even seems to be better where white is, but at the same time Random UV works better with the other colors - so I decided to use it.
0:34 - We delete the old Edit Guides from previous lessons and adjust the number of guides we want in HairFromGuides. Remember - this will be the number of clumps we need.
0:51 - We see that HairFromGuides does not work perfectly with the gradient mask, the transition is not as smooth and where there is black - of course there are no guides. But we can always add them.
1:03 - To do this, add a new Edit Guides
1:10 - Switch to Brush mode and select the familiar Create brush. But this time we will use Random instead of Center Position.
1:19 - The main thing is to find an ideal value for Spacing and Count that suits you. In my case I was happy with Spacing = 10cm and Count = 2.
1:40 - Now go to the main fur and click Create in Clump again. Recall from previous lessons that the GUIDES CLUMP object is added to the External Clump.
1:50 - We get this result and the task is done.
Scene attached =)
Thank you and have a great day
Best regards,
Andrew. ___
I'm 3D grooming Artist since 2016 My portfolio YOUTUBE |
