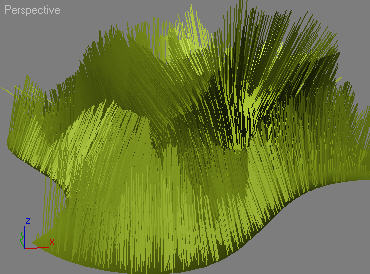
 Hair from Guides Modifier

Dense hair is indirectly generated from a sparse model provided by user
This modifier's primary task is to take in a set of guides and based on the provided info create a dense hair volume based on those guides. For more information about guides, read the sparse and dense hair relationship section.
This modifier generates dense hair based on a sparse guide model provided by user. Hair from surface is responsible to produce arbitrarily dense hair strands that best describe the volume specified by provided guides. Just like the guides from surface modifier, you get the distribution options to control the way dense roots are distributed over the mesh (for more info on hair distribution, read guides from surface page).
Videos
|
Working with hair partings |
Detailed Hair from Guides overview (Russian with English subtitles) |
|
Hair from Guides overview, part 2 (Russian with English subtitles) |
Parameters
Root distribution
There are several distribution methods for spreading hair roots along the surface:
Uniform
Roots are placed in a linear manner forming a 'grid' around the mesh. This can be useful while creating brush patterns where hair has been planted artificially.
Uniform Randomness
A parameter called Uniform Randomness is available to offset hairs in random directions after they've been created with Uniform distribution. This can be used to fix the exact even positions of uniformly placed roots and give them a little variation. Use this parameters for creating feathers, for example, where hair roots need to be placed evenly yet have some variation on the surface.
Uniform Randomness only works when Uniform distribution method is used.
Random (area-based)
Roots are created randomly, and the amount of roots per face is calculated based on the total area of all faces on the mesh. Therefore all roots will be distributed evenly and randomly throughout the mesh. You can control the random factor through the seed value. Same seed values will produce similar results.
Random (face-based)
Same as above, except the amount of roots per face is the same for every face on the mesh. Therefore larger faces will tend to have sparser root placement, while smaller ones will have roots more clustered in one spot.
Random (UV-based)
Same as area-based approach, except this time instead of calculating area for every face, UV area of faces is calculated. This allows user to control the distribution by maintaining UVW coordinates on the mesh. It is possible to unwrap a character, for example, and have dense placement of hair in some spots than the others by stretching out those areas in the UV editor.
Face Center
Roots are placed at the center of each triangle.
Parametric
This distribution will only work with parametric surfaces. It simply places roots randomly throughout the whole surface so even distribution is guaranteed.
Guides has hair
Simply converts incoming guides into resulting hair without generating any new strands.
Use Guide Proximity
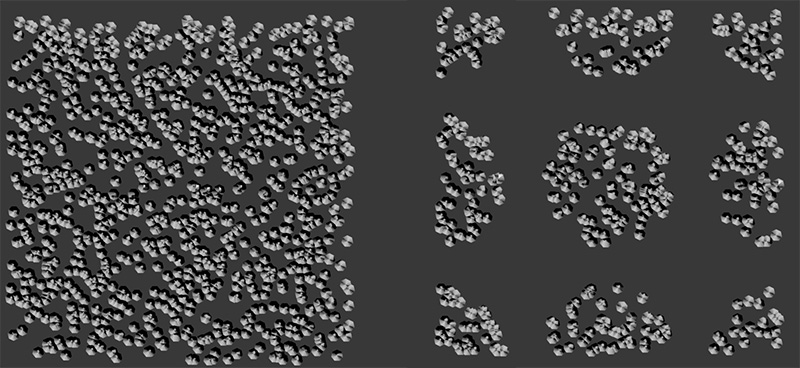
When on, only hairs that are within a certain distance of a guide will be generated. Hairs far from guides will be culled.
Guide Proximity Distance
When Use Guide Proximity is on, this specifies the maximum distance a hair must be away from a guide for it to be generated. This will make hair only be generated around guides.
Note that if you use Barycentric interpolation guides will be chosen based on the distribution mesh vertices and thus you might not get the exact results. To avoid this use Affine interpolation.
 On the left all hair is generated. On the right guide proximity is turned on, causing hairs to be generated only around their closest guides. |
Hair interpolation
There are several parameters that can dramatically change the look and behavior of dense hair as a subset of guides. Whenever a hair strand is planted, it has to be interpolated in order to achieve smooth transition from guide to guide. There are a couple of interpolation types available:
Polar interpolation
Use internal strand space, interpolate by rotating transforms.
This method will produce the smoothest results. For every created strand hair orientation is determined by the surface normal at that location. Therefore as the surface curves, hair will curve along with it. Strands are interpolated in their local space so you will see them rotating which might not always be ideal, especially for longer hair.
If used properly, only a few guides on the whole surface could be required to form a hair volume. Ð downside to this method is that polar interpolation will have two poles (or sinks), where hair will not be well defined and will tend flip. If you only need a part of your surface covered, or if the surface is not fully round, this method is the best to use.
This option is recommended when using the instanced strands option.
Affine interpolation
Uses closest guides, interpolate in object space.
Unlike the above method, this interpolation type does not take surface information into account. Instead it directly interpolates between strands. Lets say there are two guides - A and B - and we create a dense strand C and its right in the middle between these two guides. The tip of of strand C will lie in the middle of the line formed by tips of guides A and B.
Barycentric interpolation
Uses distribution mesh vertices
This is the default, and most robust method. To interpolate hairs between guides this method utilizes surface dependence information and underlying mesh topology. This is only possible if you have both of these available. At first, for each vertex on the distribution mesh closest guide information is calculated. Then for each hair the closest vertices are looked up on the mesh and information from these vertices is used to determine which guides will be used for interpolation.
The downside of this approach is requirement for the distribution mesh to be relatively dense. If there are too few vertices then you might lose guide information.
Guide Area Barycentric Triangulation Type
When using Barycentric interpolation type there are different ways to calculate the interpolation:
- Distribution Mesh
The interpolation uses the mesh topology to determine how guides affect the generated hairs - Nearest Neighbour Triangulation
Guide roots are re-triangulated and the result is used to determine the interpolation. This method is slower but gives better results. - Manual Triangulation
Same approach as above but additional steps are undergone to remove some artifacts
Segment interpolation
Using this method can produce better results if you have guides which greatly change shape and want the resulting hair to blend between these guides smoothly. It blends guides using their individual segments and tries to smoothly blend the overall length of each strand.
For the first two interpolation types you can control the amount of guides that every dense strand is interpolated in between. Setting this value to 1 will result in no interpolation at all, and every dense strand will automatically copy the nearest guide. Setting this value to 3 will result in a triangular interpolation where every strand will be an average of 3 closest guides. Note though, that barycentric interpolation always uses three guides and setting a lower guide count will make hair length largely dependent on how far the two or one closest guides are to it.
One of Ornatrix options for hair generation is strand instancing. Very much like object instancing, this option will create instances of guides instead of making new strands. This means that instead of copying guides, every strand will simply use it as a reference. There is a significant speed increase when using instancing and therefore it can be a good way to speed up modeling hair preview. One of the major downside to strand instancing is that no interpolation can be done to instanced strands. Be very careful when using instanced strands. Things like dynamics, surface combing, and many other components work on assumption that every strand is unique and cause cause unexpected results when processing instanced strands.
Finally hair can be parted to create separate groups that are not interpolated in between. Partings can be auto-generated, specified with a map or a channel, or created manually in partings sub-object mode.
Interpolation Weight
Allows the use of a guide channel to control the interpolation weight or how much hair is attracted to specific guides.
Generated Data
Generate Per Strand Data
When on, any per-strand data present in guides will be interpolated into resulting hairs
Generate Per Vertex Data
When on, any per-vertex data present in guides will be interpolated into resulting hairs
Root Displacement
Parameters in this group control if and how roots are moved from their generated position. Use these controls to add an additional offset to hairs along surface normals.
Displacement Offset
An optional offset along surface normals of generated guides. Allows you to push away guides from the surface if needed.
Displacement Map Minimum Value
Specifies the offset for black values of the displacement map. 0 by default, if this is -1 then displacement will be negative, if it is 0.5 then displacement will happen on both sides of the surface.
Displacement Map
An optional surface map multiplier for the Displacement Offset parameter. Use to vary displacement along the surface with a texture map. You can also invert the values of this map with the button to its right.
Root Caching
Ornatrix can store the positions of generated roots in memory instead of having to re-generate them from scratch when scene opens or if distribution parameters change. This allows you to have predictable unchanging hair roots which are guaranteed not to change in the future. The following options control this process:
- Remember Button
Pressing this button will make the modifier generate and cache the root positions of rendered hairs. This is sometimes necessary to ensure that the generated hair will remain consistent among shots rendered on different computers since random generation algorithms can vary across hardware. As such, it is often a good practice to press this button when rendering hair on a render farm. Un-pressing the button will clear the cache. The cache is stored with the scene and thus will increase your scene file size. The button must be un-pressed and then pressed again if you modify any of the distribution parameters to reflect the changes. The caching process might take a few seconds depending on your render hair count. - Cache File Path
This holds an optional Alembic file path where the root information is stored when specified. If this parameter is empty roots will be stored along with the .max scene, making it larger in size.
Other parameters
Many of the options used by this component are similar to those used in guides from surface. Please refer to that help for reference.
- Additional root data
These four options control which data gets exported with hair. Some data, such as per-root transform matrix takes up a lot of memory (in fact it takes same memory per-root as 4 vertices). Therefore if you are sure that some of this data isn't going to be used later on in the pipeline you can choose not to export it, thus saving memory. One useful example is removing root tm and guide dependence data when exporting very dense fur. Read section on optimizing hair pipeline for more information on hair data. - Export object type
This determines whether dense hair or guides are generated. Sometimes during modeling it is useful to interpolate between results to increase/decrease guide count. - Use guide faces
When used, this option will plant new roots only on faces that are close to guides. Using the iterations parameter you can control how close a face has to be to a guide for roots to be planted on it. 1 means roots have to be on same face as one of the guides. 2 means roots have to be on a face that touches a face that has a guide on it. This usually works well with meshes that have many faces. - Instanced strands
If on, all strands will be instanced by provided guides. This means that really only one hair is generated per a guide, and the rest are simply using same memory to display the guide offset at their root. Memory usage is greatly conserved, especially with very dense hair objects.
For best results it is advised that you use polar interpolation to generate the dense hair from guides using this option. - Use UV coords
Specifies whether mesh UVW coordinates or root world coordinates are to be used to determine relative guide/hair positions. - Auto-part hair
It is often necessary to have different groups of hairs on a mesh. By default this isn't possible since hairs all interpolated to form a continuous volume. Auto parting takes an angle or distance threshold and determines whether hair should be interpolated between specific guides or not. If two guides are oriented or located apart further than provided thresholds a parting will be generated between them. Note that you may also part hairs using a map or a guide channel. - View Count from Render
When enabled, the number of hairs displayed in the viewport will be determined by the percentage value of the render count parameter. - View Count Percentage
When View Count from Render parameter is on, this determines the percentage of dense count parameter which determines number of hairs displayed inside viewports. - Render Count
Determines the number of hairs generated by this modifier when rendering the scene.
Troubleshooting
There are patches of absent hairs when distribution surface is too thin.
Problem
This can happen when distribution surface generates hairs on both sides and is too thin. An example could be an ear lobe or a wing. The reason patches appear is because the hairs are interpolated between guides in object coordinates and can interpolate with guides on the other side of the mesh.
Workaround
Check the "Use UV Coords" option in the Hair from Guides modifier rollup, in Interpolation Space group:
C++ SDK Access
Most of the functionality of the Hair from Guides modifier is available through HairFromGuidesModifierFPInterface located in C++ SDK HairFromGuidesModifierFPInterface.h file.
#include "Public\HairFromGuidesModifierFPInterface.h"

// Get "Ground Strands" interface:
auto hairFromGuidesInstance = HairFromGuidesModifierFPInterface::GetInterface( myModifier );
MaxScript Access
Gain access to Hair from Guides modifier:
hairFromGuidesInstance = $MyObject.modifiers[#Ox_Hair_From_Guides]Functions in the interface:
-- Invalidates current cache and forces a full root regeneration next time it is requested
hairFromGuidesInstance.InvalidateCache()

-- Enters 3dsmax into "Create Partings" mode to allow user to start creating partings
hairFromGuidesInstance.CreatePartings()

-- Deletes selected partings if currently in parting sub-object mode
hairFromGuidesInstance.DeleteSelPartings()

-- Sets whether the render hair positions should be cached with the scene or not. Passing true will force the cache to be updated.
hairFromGuidesInstance.SetCacheRenderHairPositions true|false

-- Gets whether render hair positions are currently being cached in the scene
areCached = hairFromGuidesInstance.GetCacheRenderHairPositions()
Examples
You can find examples on usage of this modifier by examining the unit tests in Test_HairFromGuidesModifier.ms.


