

Your First Groom
In this guide, we will apply the concepts we have learned in Basic Ornatrix Concepts. We will create a groom for our teddy bear model, aiming to keep the process as procedural as possible. This will involve root generation, combing, hair interpolation, adding details, shading, and ultimately, rendering. You can download the necessary assets from Here. Let's get started!
Preparing the Model for Grooming
First, ensure that your 3D model has UV coordinates. Several root distribution methods rely on UV coordinates. Additionally, UVs are essential if you intend to apply multiplier maps to Ornatrix operators, such as a distribution map in the Hair From Guides or Frizz operator to control where the frizz effect is applied to your groom. Both Hair From Guides and Guides From Mesh allow you to choose the UV channel for operator computation. This means you can have multiple UV channels and reserve one exclusively for grooming. This is especially useful if you want to fine-tune the root distribution, or if you require separate UVs for texturing and grooming.
Make sure you are grooming on the final character topology. Some Ornatrix operators, such as Guides From Surface and Hair from Guides, are topology-dependent. This implies that if the character's topology changes, the guides and hairs will be regenerated with the new data. However, it is still possible to modify the character's topology in the middle of grooming, as explained in Root Persistence in Guides From Surface
Generating the Groom Guides
- With the Body object selected, go to the Ornatrix menu on the top bar and click Add Hair to open the groom preset selection window.
- Choose the Basic preset.
- Click "Create."
This action will generate a hair object with the following modifiers in sequence: Guides From Surface, Edit Guides, Hair From Guides, and Change Width. Your groom should now resemble the following image:
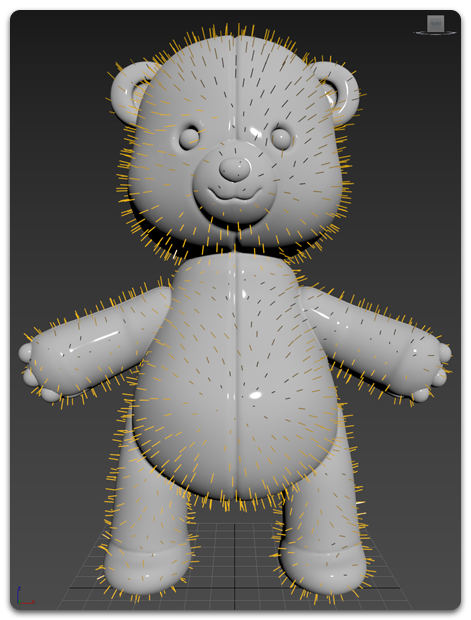
NOTE: For the sake of this tutorial and for better visualization, the Strand Width taper was removed and the base value was increased.
For now we only need the Guides from Surface operator. For a cleaner approach we will add what we need later. For now, remove all the operators above Guides from Surface.
Select Guides from Surface to see its settings. This operator is in charge of scattering strand/guide roots on the selected polygon mesh, and so, we have settings to tweak the result. These strand roots will then be used by the Hair from Guides operator to interpolate the actual hairs on the surface. See it this way, Guides from Mesh generates the guides that you can use to comb and define the shape of the final hair that will be generated by Hair from Guides.
- First, the Distribution Method. This determines how the guides are distributed on the surface. The default distribution method is " Even ", it creates a nice and even root distribution. This interpolation method works best on all cases like human hairs or animaal fur, but it is also the heaviest on performance compared to the other methods. When working with millions of strands, is adviceable to use "Random Area", which is faster and uses less RAM, or any other. In this case, our teddy bear will not have that many hair strands, so we will keep the " Even " method.
- Adjust the Guide Length to your preference (you may want to refer to image references). For now, set it to 2.5cm.
- Set the Point Count to a lower value for now. The default is 10, but we don't need that level of detail at this stage. We can increase it later using a "Detail" operator when adding more effects and fine details to the hair. The point count is the amount of vertices on each strand. Increase the point count when you need smoother or higher definition strands.
- Set Length Randomness to 0. We'll use a Length operator later to control strand length and randomization.
- Increase the Guide Count from 300 guides to 1000 to ensure sufficient coverage across the entire surface and prevent large empty areas.
For now we are done in Guides From Surface. At this point your groom should like similar to this: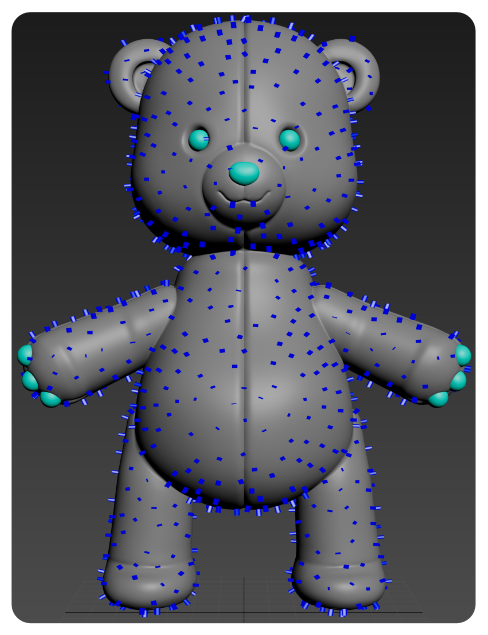
Combing the Guides
Surface Comb
You can comb the guides or strands using different methods, like brushes or the Surface Comb operator. Let's see how it would work using the Surface Comb operator first.
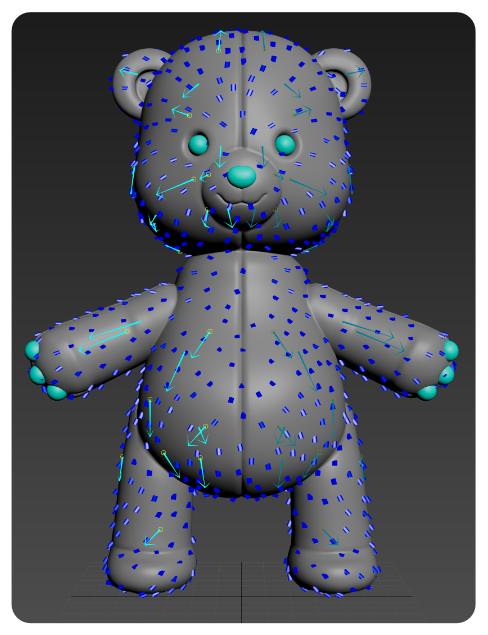
This operator allows you to define the overal flow of the strands using arrows that we call sinks. Sinks can be added, removed, moved and each one have properties that you can edit individually or as a whole.
Adding Sinks
To use Surface Comb and Sinks:- Add a Surface Comb operator.
- Expand the Surface Comb modifier to reveal the "Sinks" section and click it to see the Sinks editing tools.
- Click the Create button, then click and drag your mouse on the character's surface to add a new sink. You should notice how the strands are deformed as you drag the sinks.
- Release the mouse button to finish creating a single sink. Continue adding sinks to quickly comb all the guides. Use sinks on one side of the mesh only. We will mirror them later.
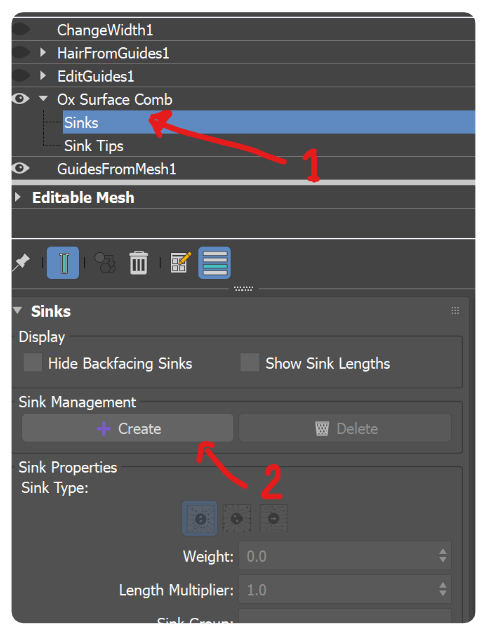
When you are done, you can drop the Create tool pressing the Q key.
Editing Sinks
You can select Sinks and edit them individually in sinks editing mode. You can modify its Weigth, Flow or even create sink groups. You can also move them using the Move tool.
|
Creating and Editing Sinks |
In this case, we want to mirror all of them to the other side of the model in the X axis.
To mirror the sinks:- Still in sink editing mode, click and drag to select all the sinks. Make sure that Hide Backfacing Sinks is disabled for this step. Otherwise it will prevent us from selecting sinks on the back of the model.
- With all the sinks selected, set Mirror Axis in Surface Comb to X .
Generating Hair Strands
Add a Hair from Guides operator. This operator generates dense hair strands interpolated between the guides. The hair density is controlled by two parameters: Root Count (hair density at render time) and Preview Strand Fraction (hair density in the viewport). The default values are 10,000 and 20%, respectively. This means that the render hair count is 10,000 strands, while preview count is 20% of that. Having a lower preview fraction helps with the viewport performance.
Adjust the settings as follows:
- Increate the Root Count as desired, whatever value looks good to you in the render. You can tweak this later.
- Set the Viewport Count Fraction to make more hairs visible in the viewport.
- In the Interpolation tab, select Barycentric as the Guide Selection for better hair distribution.
- In Barycentric Interpolation Type, choose Manual Triangulation.
Leave the rest of the settings as default. At this point your teddy bear should look similar to this(Show End Result is enabled in the modifier stack):
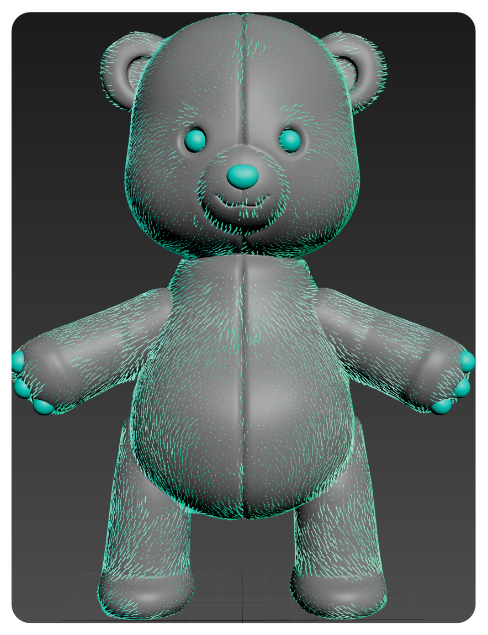
The hair is being generated on the whole character, but we don't want that. To control where hair is added, we can use a distribution map.
In your preferred painting application, paint areas you want to exclude (e.g., inside the mouth and eye sockets) with pure black and sharp borders. On another layer, add a gradient to areas where you want to reduce hair density (e.g., around the eyes and nose). You can also paint light gray on seams for later use as a length map to adjust fur length. This is how our Distribution Map looks:
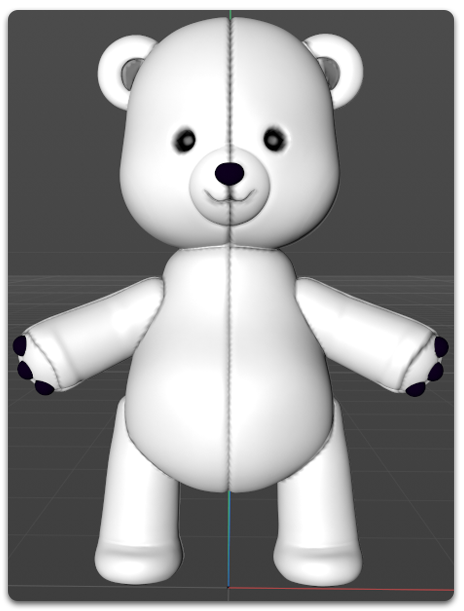
For better control, it's advisable to create separate distribution and length multiplier maps for the Hair From Guides and the Length operator. Storing these maps in separate files allows for more precise adjustments. Hair from Guides works better with pure black and white values. While the Length operator can take advantage of smooth gradient values. You can combine both for better length transitions like fading on haircuts or smooth transitions from skin to hair or hairlines.
Create a distribution map using pure black and white to control hair distribution. In a different layer, paint a length multiplier map with smooth gradients to fine-tune hair length. Utilize gradient values to selectively reduce strand length in appropriate areas, e.g., around the eyes and nose. By maintaining these maps separately, you'll have more flexibility and control over your hair grooming.
Using Distribution Maps
Hair from Guides allows you to use 3 different distribution maps and adjust the amount value of each one. For this tutorial we only need one.- In the "First" map field, you should see a button next to it, click it to add a map.
- Double click on "Bitmap".
- Load the distribution map.
This will remove hair from the black-painted areas: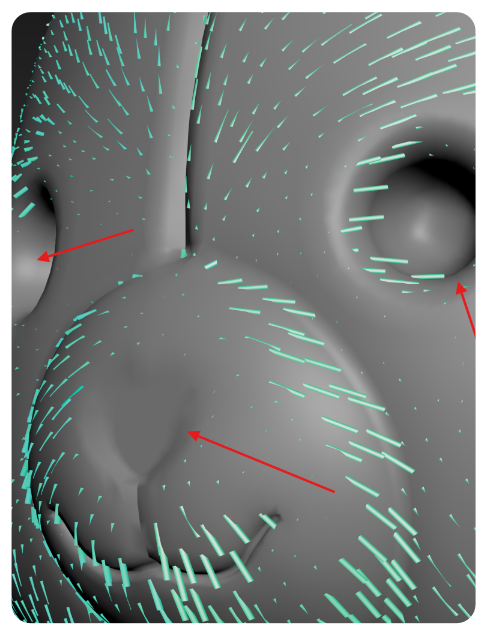
Tweaking Surface Comb
thrthr
Detailing
Adding Details Using Strand Channels
In this section we are using Strand Channels to drive various parameters in the operator stack.
- Return to the "Surface Comb" operator and add Edit Guides after it.
- Create a "per-strand channel" following the instructions in Working with Strand Channels, and name it "LengthCH" or any recognizable name for later use. The newly created strand channel will appear in Edit Guide's Strand Channels list.
- Add a Length operator.
- In the Length operator, find the Value Channel list and select the newly created "LengthCH" channel.
We will use a Length operator to shorten the fur around the mouth, ears, and nose.
Alternatively, you can use the Length multiplier map that we created previously. If you prefer this method, you can skip the steps to create the strand channel. However, it is useful to a a strand channel that can be recombined and reused in any operator along the operator stack.
In the per-strand channel we've just created, all values are currently set to black, which means the length of all the strands is set to 0. To change this:- Return to the "Edit Guides" operator.
- In Root editing mode, select all the guides.
- Choose the "LengthCH" channel.
- In the Channel tab, set the Current Channel Value to 1 (where 1 = White and 0 = Black).
- Click Assign Value to Channel to apply the new value to all the selected strands.

Now that you've set the length to 1 for all the guides, you can use the Paint Brush in brush mode to paint darker values around the eyes, nose, ears, or any other areas where you want to reduce the fur length. These changes will be visible in real-time as you paint.
|
Working with Strand Channels |
The following gif shows the before and after editing the strand length using a strand channel:

Clumping
It's time to introduce some clumping to the hair.
- Add the Clump operator after "Hair From Guides".
- In the Clumps section, set the Clump Count to the desired result and click Create.
Note: Remember to click the Create button each time you change the Clump Count parameter or the hair amount in Hair from Guides to see the updates.
At this point, it is recommended to increase the Viewport Count Fraction to 100% to have a better idea of how the clumps will look like in the final render.
|
Real-time viewport hair rendering in Cinema 4D viewport |
This is how our teddy bear looks like with 6k clumps and 50k hair strands:

You can further refine the clumping by adding a strand channel, similar to what we did with the Length operator. Use this channel to adjust the clumping strength in specific areas and introduce variations. In the following example, we used a strand channel to reduce the clump strength on the shorter strands for a more natural look. This is where the "LengthCH" strand channel could be reused.
Notice the difference between the hair appearance with and without the painted strand channel:

Frizz
As we approach the conclusion of the grooming process, we'll add some frizz to the fur to give it a more natural and fluffy appearance.
- Add a Frizz operator after the Clump operator
- Reduce all the parameters to 0, except the Amount. This will allows us to add some volume to the fur without getting interference from other effects found in the Frizz operator like Scale or Outlier strands, we will add those later.
- Adjust the Amount value until you achieve the desired level of frizz. This will help break up the patterns created by the Clump operator and to open the clumps a little bit, adding some volume to the fur:


Now, let's introduce some outlier hairs.
- Add another "Frizz" operator after the previous one.
- Set the Amount value to 0.
- Experiment with the Outlier Amount and Outlier Fraction to add outlier hairs.
Notice the difference in hair appearance with and without outlier hairs, especially when the Outlier Fraction is set to a value like 40%:
Feel free to use a strand channel to fine-tune where the frizz is applied to polish the final look.
Eliminating Fur Penetration with the Character
At this point, you might notice that the fur penetrates the character's mesh in some areas like the ears, as shown in the image below:

To resolve these intersections, we'll employ the Push Away From Surface operator.
Add the "Push Away From Surface" operator after the "Hair From Guides." You can also place it before "Hair From Guides," but in that case, it will only push away the guides, and the hair interpolation will cause some hairs to intersect with the mesh anyway. The choice depends on your specific requirements or performance considerations. Using it after "Hair From Guides" ensures that every single strand is pushed away from the character's surface. The more strands it computes, the greater the performance hit. Even with the default settings, "Push Away From Surface" will significantly reduce fur intersection issues.
Before and After adding "Push Away From Surface" operator:
Rendering in the Viewport
We are done for now. It is time to see how our groom looks in the viewport. For better hair strand visualization in the viewport, go to the Display Tag of the hair object, enable the following options:
- Viewport Lights. Ensures that the viewport lights affect the hair object.
- Viewport Mesh Strands. Render the hair strands as meshes.
- Camera Facing Normals. Ensure that the strand normals are always facing the camera for better shading in the viewport.
- Per Strand Coordinates. Generates a UV island for each hair strand. This ensures that each hair strand is properly shaded from root to tip in the viewport.
The settings above are only valid in the viewport. They do not affect the final rendering on Redshift, Octane, etc.

Final Thoughts
In this first part of the tutorial, we've applied the concepts outlined in the "Basic Ornatrix Concepts" article. We've covered everything from hair generation to grooming and detailing.
This is how our hair stack looks up to this point:

Project files and Sample Scene
Here you can find a folder with all the assets used on this tutorial. The folder includes a .obj file of the teddy bear, the distribution map used in Hair From Guides, the final scene accomplished in this tutorial and a second version of the final scene with Mesh From Strands for proper viewport visualization. The scene was created in [Max version] and will be updated with the latest versions of Ornatrix to ensure compatibility.
Sample scene changes notes
1.0 - Scene created in [Max version] and Ornatrix [Version].