Basic Concepts
Summary
In this guide, we will explore the fundamental concepts of Ornatrix to help you begin creating hair grooms. By the end of this guide, you will have a solid grasp of the Ornatrix hair stack, operators, hair interpolation, and hair distribution.
Note: Throughout this guide, the terms "Modifier" and "Operator" will be used interchangeably.
The Hair Stack
Ornatrix hair is often composed of one or more operators, represented as Deformers or Generators in Cinema 4D, applying changes one after another to generate grooms procedurally. This stack is represented within C4D's Objects tab.

Each operator under the Hair Object item is connected to one another to create the final groom. An operator generates some data, passes this data to the next operator, and so on until the data flow reaches the final output. You can add, delete, and reorganize the operators in the stack at any point. Changing any parameter will propagate the new data across the hair stack, passing through each operator from the point of modification to the top. New operators can be added using the Ornatrix menu.
Guides From Mesh modifier
In this particular example, 'Guides From Mesh' is the first operator in the hair stack of this hair object. This operator is responsible for generating root data using one of the available root distribution methods, creating guides, and scattering them on a mesh. The generated guides are then passed to the next operator for further processings.

In addition to the Distribution Methods, several parameters are available to allow the user to fine-tune the final result. For example, the 'Guide Length' parameter determines the length of the hair guides. You can also connect a texture map to the 'Distribution Map' slot to determine the distribution area, where black values equal 0 guides.
Edit Guides
Allows you to refine the guides generated by 'Guides From Mesh' by brushing them, creating and deleting guides, grouping, painting, and performing other manual operations, rather than relying solely on parametric adjustments. Additionally, it can be used to directly brush hair strands.

Edit Guides provides three different editing modes that allow you to interact with the guides in various ways:
Root mode
Enables you to select and manipulate the guides based on their roots.
Strand mode
Lets you select and manipulate the guides as a whole based on the guide vertices.
Brushing mode
It offers a set of brushes that allow you to edit the hair in various ways using brushes.
The available brushes are:
- Selection Brush
Use it for strand selection.
- Move Brush
Use it comb the hair.
- Rotate Brush
A rotation is applied to the strand in the opposite direction of the brush stroke and using the first vertex point that is inside the brush radius as pivot, creating a curve effect.
- Scale Brush
The guides inside the brush radius are attracted to or expelled from each other.
- Cut Brush
Cut the guides inside the brush radius.
- Length Brush
Enlarge or shorter the guides while respecting the limits established in the Brush Min Limiter and Brush Max Limiter parameters.
- Paint Brush
Use this brush to paint Per-Root or Per-Vertex Strand Channels that can then be used for shading or to drive all kind of Ornatrix operator effects.
- Grab Brush
Similar to the Move brush but only the strands that are initially inside the brush radius will be grabbed and dragged with the brush locator.
- Revert
Sets the strands vertices to its initial state before the current Edit Guides operator. In essence, this brush is like an eraser, reverting any changes made to the strands by other brushes.
- Pull Brush
Pull the strand vertices away from the distribution mesh eventually straightening them.
- User Defined Brush
Allows you to load your own custom brushes defined using Ornatrix's Python API. There are two custom brushes available: Clump brush and Move brush, both of which you can find the Python scripts in the scripts/brushes directory of your Ornatrix installation. For more information on user defined brushes see Writing Plugin Brushes.
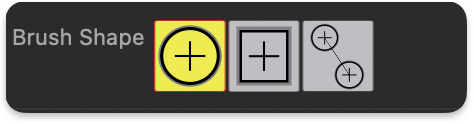
Ornatrix brushes can be used with different shapes, like a Circle, a Square or a Line. The line is specially useful with the Cut brush to make straight cuts to the hair.
Ornatrix brushes share common settings, with some unique settings that apply only to specific brushes. Generally, the names of brush settings are descriptive enough to understand their function immediately. In the settings section, you will find the familiar controls to adjust the brush size and strength, as well as checkboxes to activate various features. The settings you will use most frequently include:
- Use Brush Surface
When this option is enabled, brush strokes are projected onto the distribution surface. This mode can be used to constrain brushing changes to make hair or fur flow along the character's mesh surface. Otherwise, brush strokes will modify the hair strands in the screen direction.
- Affect Selected Only
Ensures that only the selected strands are affected by the brush actions.
- Optimize Strand Geometry
When activated, a special algorithm is used for comb, grab, and smooth brushes. It affects the whole strand along its length by calculating the best fit to the current stroke while minimizing changes to the strand shapes.
- Brush Mirror Axis
Select the axis to mirror brush actions. Changes made on one side of the hair will be reflected in real-time on the opposite side.
- Brush Attenuation
This section includes two ramp curves that allow you to adjust brush strength attenuation and strand strength attenuation along the strand, from root to tip.
See the Edit Guides documentation for a more in depth description of all the brush settings.
Strand Groups
Strand groups help you categorize strands into distinct regions, allowing you to selectively apply operators down the evaluation pipeline. In the Strand Groups section, you can easily create and assign groups to the hair guides.
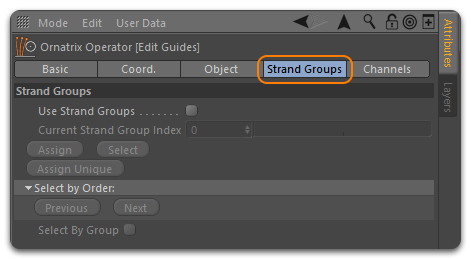
Enable Use Strand Groups to activate the controls for creating strand groups. This section also offers options to select strand groups by their integer number(ID) and to select entire groups using the Selection Brush or the selection options available in Root and Strand editing modes. To create a strand group, simply select some guides/strands and click the Assign Unique button. For more information, refer to the Working with Strand Groups documentation.
Strand Channels
Channels in Ornatrix allow users to add extra data to guides for later use. There are two types of guide channels used by Ornatrix: Root channels and Vertex channels.
Root channels These hold a single data value for every root (strand). It's a space-efficient way to define uniform information for every strand, making it effective for controlling properties that don't typically vary along the strand's length, such as hair density and dynamics properties.
Vertex channels These hold per-vertex data, with each knot defining the shape of the strand having a value attached to it. While more memory-intensive than root channels, they provide the ability to control properties at any point on the hair model. Vertex channels can be useful for controlling clustering, frizz, and hair shading.
For more details about Strand Channels, see Working with Strand Channels."
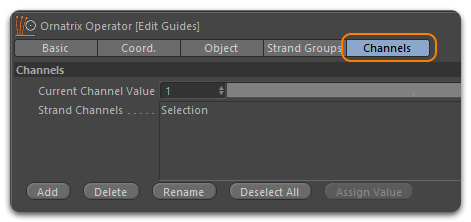
To create a strand channel manually:
- In enter Brush mode and go to the Channels section.
- In the Strand Channels box select --Per-Strand Channels-- to create a Root channel or --Per-Vertex Channels-- to create a Vertex channel and click the Add button, enter a name for your channel and click OK. The best strategy is to name channels according to their purpose, and organize so you know clearly which channel performs which operation.
- Switch to the Paint brush, use the Current Channel Value slider to choose a gray scale value between 0 and 1.
- Select the newly created channel and use the brush to paint them.
 Painting a Per-Vertex Channel |
- Alternatively you can select some strands in Root editing mode, or using the selection brush in Brush editing mode,
- Use the Current Channel Value slider to choose a gray scale value between 0 and 1.
- And click the Assign Value to Channel button.
You can also add Edit Guides on top of Hair From Guides to create channels directly on the final hair strands, however this method is more memory consuming. Guide channels can also be procedurally generated, visit the Generate Strand Data operator documentation page to find out how.
Hair From Guides
This operator is used for hair root distribution and hair interpolation. See the Root Distribution and Hair Interpolation section to learn more. Hair From Guides is responsible for generating dense hair based on the guide data passed by Guides From Mesh. The hair interpolation is performed using one of the several hair interpolation algorithms available in Ornatrix.

The UI of Hair From Guides is very similar to that of Guides From Mesh, However, the former includes additional parameters for hair interpolation, parting, and other parameters exclusive to hair generation.
Distribution Settings
The Object tab contains all the settings related to hair distribution (refer to Root Distribution and Hair Parting for other settings ). Here's a list of the distribution settings you are most likely to use in your initial grooming work. The remaining settings can be found in the Hair From Guides documentation page.
- Render Count
Specifies the total number of roots to generate during rendering.
- Count Fraction
Specifies the percentage of roots to generate inside viewports based on the Render Count.
- Use Render Count
When ON, the total amount of hairs specified in Render Count will be displaced in the viewport.
- Distribution Multiplier
An optional multiplier map for hair density on the surface. A texture map with black and white values, the hair will only be generated on areas painted in white.
- Distribution Channel
As explained in Working with Strand Channels and Strand Channel Selection List you can use channels in Hair From Guides as well. Paint a channel to allow hair interpolation only among a group of hair guides. Guides painted black will not produce hair while white values will produce hairs.
- Displacement Offset
An optional offset along the surface normals of generated guides. This allows you to push the guide roots away from the surface if needed, which is useful when your base model uses a displacement map that differs significantly from the low-poly viewport version where you create your groom. Connect your displacement map in this slot to conform the hair strand roots to the displaced version of your base model.
- Remember Root Positions
This option makes the operator generate and cache the root positions of the generated hairs. It ensures that the generated hair remains consistent among shots rendered on different computers since random generation algorithms can vary across hardware. It's a good practice to enable this option when rendering hair on a render farm. Disabling this option will clear the cache. The cache with the root positions is stored inside the scene by default, but you have the option to store it in a file on your hard drive.
Change Width
Determines the hair strand width at render time. It gives you direct access to the width values stored inside the hair object, this ensure consistency across all render engines and operators.

Collapsing the Hair Stack
Each Ornatrix operator includes a 'Bake' tab in the Attribute window. In this tab, you'll find the 'Collapse up to Here' button. This function enables you to collapse the hair stack up to the selected operator, combining all the operators below it into a 'Baked Guides' or 'Baked Hair' operator. If the stack is collapsed below 'Hair From Guides,' a 'Baked Guides' operator is created. If the stack is collapsed above 'Hair From Guides,' a 'Baked Hair' operator containing the combined operators is created.
When a 'Baked' hair object is generated, it automatically re-attaches its strand or guide roots to the distribution mesh linked to this object. However, it also allows you to select a new distribution mesh for transplanting the hair object onto another character. To replace the base mesh, go to the 'Ground' tab, and simply click and drag a mesh from the Object window to the 'Distribution Mesh' field.
 Baked Hair operator |
This operator also offers five empty slots for loading Alembic hair files from Ornatrix for Maya, 3ds Max, or other hair systems capable of exporting Alembic files.
 Baked Guides operator |
In the Baked Guides operator the grounding is done in the Object tab.
Operator Types and Order of Operations
Ornatrix operators can be divided in the following categories:
Generators
Operators that generate strand data from another dependency like a polygon mesh, spline curves or Ornatrix strands.
Between the generators we can find:
- Hair From Mesh Strips
Generates hair from polygon mesh strips.
- Curves From Strands
Generates native splines curves from Ornatrix hair strands or guides.
- Mesh From Strands
Generates a polygon mesh from Ornatrix hair strands or guides.
- Guides From Mesh
Generates hair guides from mesh.
- Guides From Curves
Generates Ornatrix hair guides from spline curves.
- Guides From Hair
Generates Ornatrix guides from hair strands.
- Hair From Guides
Generates and interpolates hair from the given guides.
- Scatter
Designed to scatter feathers on strand roots.
- Generate Strand Data
Used to generate strand data like strand channels and strand groups based on parameter input or SeExpr.
Deformers
Operators that deform hair strands or guides, taking data from the previous operator in the stack, making procedural or destructive deformations, and passing this data to the next operator for further deformation. Examples include:
- Change Width
Determines the hair strand width at render time.
- Ground Strands
Sets the dependency or distribution mesh for all the guide roots.
- Frizz
Adds Frizz and outlier hairs while preserving the strand length.
- Curl
Adds waviness and curliness to the hair strands.
- Clump
Adds clumping by guide roots, by strand groups and random clumps with tools for manual clump creation and editing.
- Length
Used to edit the strand length.
- Detail
Change the resolution of the hair strands by increasing or decreasing the amount of vertices per-strand.
- Surface Comb
Defines the shape of the fur along a surface using arrow manipulators or "Sinks".
- Rotate
Rotate strands operator defines the twist value of individual hairs.
- Symmetry
Adds symmetry to the hair object on the X, Y or Z axis and sets the guide dependency or distribution mesh for the mirrored side.
- Normalize Strands
De-tangle the hair strands, eliminating inter-penetrations in the hair.
- Adopt External Guides
Is used to animate the hair using a set of guides external to the current hair object.
- Push Away From Surface
Push the hair strands away from the distribution mesh and other external objects on a per-vertex basis.
- Gravity
Adds gravity effect to the hair.
- Edit Guides
Allows you to groom the strands generated by Guides From Mesh or Hair From Guides using an intuitive set of brushes and tools.
Animation
Animation operators are also deformers oriented to animation. For example, Moov Physics takes the strand vertices and deforms them based on a PBD simulation.
- Moov Physics
This is our CPU based hair simulation engine. Allows the user to create realistic hair simulation using different simulation models like Cosserat a Distance based model or a combination of both. The user have the option to create his own hair simulation scripts using Python.
- Resolve Collisions
Deforms the hair vertices to create collisions with the distribution mesh or external objects without a full physics simulation.
- Oscillator
Uses an oscillation algorithm to create inertia movement without full physics hair simulation.
Hybrid
Hybrid operators perform both tasks. They generate hair data and and also deform the hair strands.
- Multiplier
Multiplies the amount of guides by the specified amount. It also contains parameter to deform the generated hair strands for adding twisting, fluff, shift and spread.
- Propagation
Generates hairs or guides along the given strands. This operator is used to create feather objects and vegetation.
- Animation Cache Modifier
Record, load and play hair animations in .abc format. This operator uses our own Alembic exporter and can read hair objects imported from any other 3D software, like Maya, 3DS Max, Houdini, and any hair system capable of exporting Alembic animations. It includes parameters to offset the animation and read Strand Channel, Strand Groups and hair Width data.
Order of Operations
In general, Ornatrix operators have descriptive names and depend on specific input data for calculations. They take input data, perform calculations, and pass the resulting strand data to the next operator in the stack. Understanding the purpose of each operator is essential for ordering them effectively.
For example, avoid placing a deformer operator like Frizz after a generator operator like Mesh From Strands. The Frizz operator needs hair input data, but Mesh From Strands converts the hair object to a polygon mesh, preventing the Frizz operator from receiving hair data.
Understanding how each operator works and its intended purpose is crucial for ordering operators effectively and leveraging Ornatrix's capabilities.
Operator UI
Each operator UI is composed of several tabs. This approach organizes the parameters in a logical manner, resulting in a cleaner UI. However, there are several components shared across all operators. In this section, we will explore the purpose behind the operator UI and identify the common elements they share.
Operator Tabs
There are two tabs that are shared across all Ornatrix operators: Object tab and Bake tab.
The Object tab contains the main settings of the operator. For example, Guides From Mesh includes all the root distribution settings on the Object tab, since root distribution is the main purpose of this operator.
The Bake tab includes includes a single button called "Collapse up to Here". As we saw in [Collapsing the Hair Stack] link text section, this function allows you to collapse the operator stack up to that point into a Baked Hair or Baked Guides operator.
Besides the Object tab and the Bake tab, some operators have extra tabs dedicated to unique settings. For example, Hair From Guides hair separate tabs for Root Distribution and Hair Interpolation.
Strand Group
In the Strand Group field you can enter an integer value identifying a group of strands in the Edit Guides operator. Strands belonging to a specific group can be edited separately by various Ornatrix operators. Find more details about strand groups in the "Working with Strand Groups" page.
Ramp Curve Attributes
The Ramp Curve attribute is includes in several operators, but only where it makes sense. For example, the Change Width operator sets the width of each hair strand and you can set the width using the "Width" slider, but you can control the width from root to tip using the Width Ramp attribute.
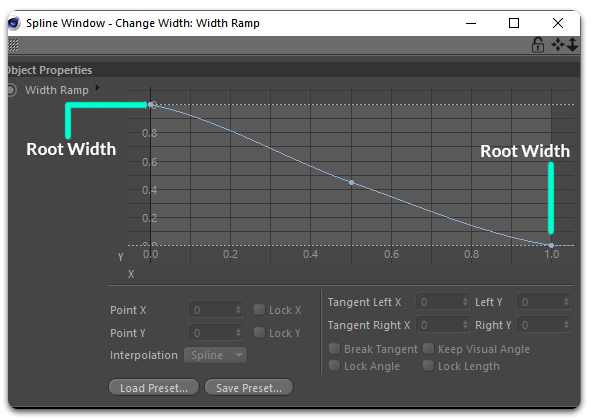
In this window, you can use a curve to control parameters of type amount on several operators, besides Change Width, you can find it in Frizz, Clump, Curl and others, where you can control the frizz amount, clump amount and curl amount respectively.
You are also allowed to create new spline points to tweak the final result and store curve presets for later use.
Strand Channel Selection List
The strand channel selection list allows you to choose a strand channel created in the Edit Guides operator or using the Generate Strand Data operator. In a similar fashion to Strand Groups, Strand Channels allows you to isolate the effect of an operator to certain areas of the hair. See Working with Strand Channels for more details.
Multiplier Maps
Multiplier maps are textures that you can used to control the Amount parameter on most Ornatrix operators. Black values will reduce the effect of the Amount parameter to 0, while White values will set the value to 1.
Root Distribution
Root Distribution is a crucial step performed by the Guides From Mesh and Hair From Guides operators before guide generation and hair interpolation, respectively. It involves scattering root positions on a distribution mesh, from which Hair Guides or Hair Strands are grown. There are several available distribution algorithms:
Uniform
Roots are placed in a linear manner forming a 'grid' around the mesh. 
Random Area
The roots will be distributed evenly and randomly throughout the mesh but the amount of roots per face is calculated based on the total area of all faces on the mesh.
Random UVs
Similar to Random Area, but it uses the UV area instead. This allows user to control the distribution by maintaining UVW coordinates on the mesh. It is possible to unwrap a character, for example, and have dense placement of hair in some spots than the others by stretching out those areas in the UV editor. 
Tuning UV Root Placement
- Random Face
Similar to Random Area but the same amount of roots is generated on every face. Larger faces will tend to have sparser root placement, while smaller ones will have roots more clustered in one spot. This distribution method is more appropriate for meshes with even topology.

- Per Vertex
This is a per-vertex distribution method. One root is generated at each vertex of the surface mesh.

- Face Center
This is a per-face distribution method, thus one root is generated at the center of each polygon face. This distribution method is more appropriate for meshes with even topology to get evenly distributed guides.

- Even
Roots are placed on the surface randomly but it tries to keep the same distance from one another. This method provides the most realistic root placement result for natural hair phenomena.

The Random and "Even" distribution method have a Random Seed parameter to control the randomization. This parameter does not affect the Vertex and Face Center distribution methods.
Hair Interpolation
Hair interpolation is the process of generating dense hair based on input Hair Guides created in Guides From Surface, Guides From Curves, Guides From Hair, or planted using the Edit Guides operator.
In the following example, Hair from Guides is used to interpolate hair(light blue) between three guides(darker blue):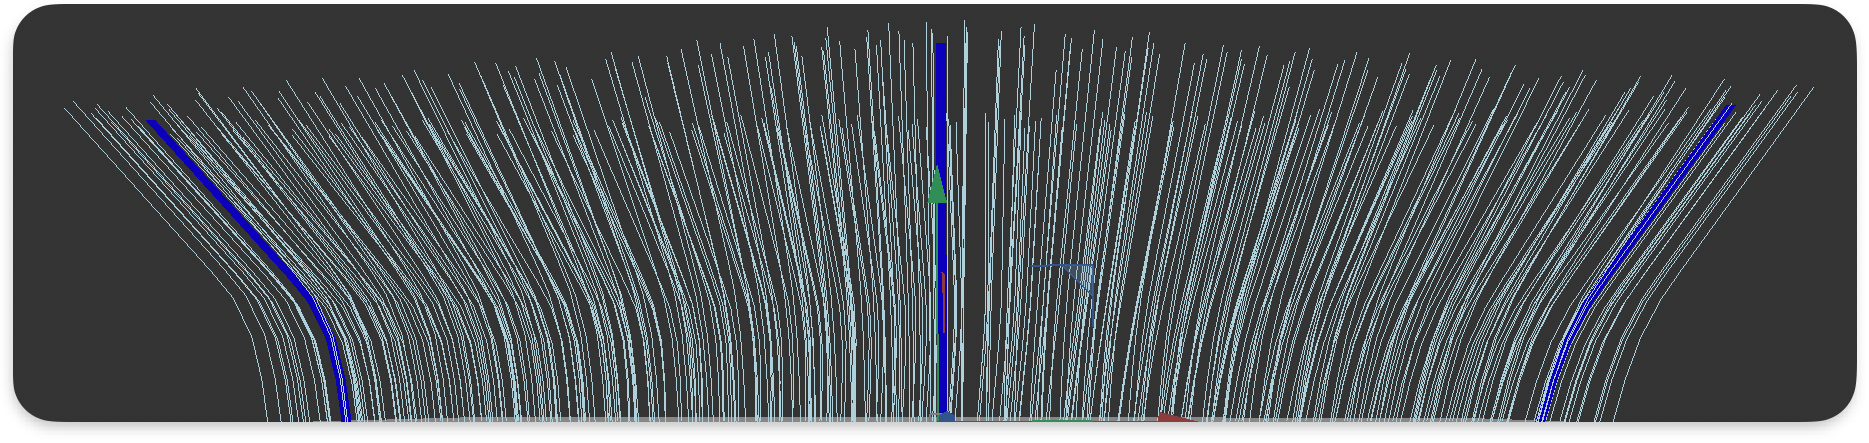
The interpolation settings can be found in the Guide Interpolation tab. Ornatrix provides several interpolation algorithms for different use cases. Combining between different Guide Selection methods, Guide Interpolation and Guide Count you can find the right hair density generation for your needs.
Guide Selection
The interpolation depends on how close the guide roots are to each other. Guide Selection tells the Guide Interpolation algorithm how close it should interpret the guide roots. You can choose between:
- Circle
Each guide have a spherical area of influence and for a given point all guides whose area of influence includes this point are used for interpolation.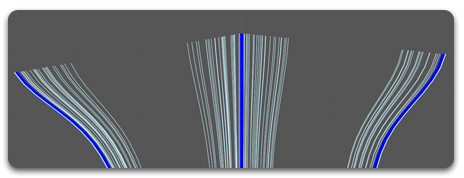
- N Closest Guides
For a given point N closest guides are used during interpolation.
- Barycentric
This method utilizes information from your character mesh and its mesh topology to interpolate hairs between guides. This guide selection method provides better results and should be used by default.
Guide Interpolation
- Polar
Use internal strand space, interpolate by rotating transforms.
Strands are interpolated in their local space so you will see them rotating which might not always be ideal, especially for longer hair.
If used properly, only a few guides on the whole surface could be required to form a hair volume. Ð downside to this method is that polar interpolation will have two poles (or sinks), where hair will not be well defined and will tend flip. If you only need a part of your surface covered, or if the surface is not fully round, this method is the best to use.
- Affine
Uses closest guides, interpolate in object space.
Unlike the above method, this interpolation type does not take surface information into account. Instead it directly interpolates between strands. Lets say there are two guides - A and B - and we create a dense strand C and its right in the middle between these two guides. The tip of of strand C will lie in the middle of the line formed by tips of guides A and B.
- Segment
Using this method can produce better results if you have guides which greatly change shape and want the resulting hair to blend between these guides smoothly. It blends guides using their individual segments and tries to smoothly blend the overall length of each strand.
Guide Count
- Do Not Interpolate
The hair will be generated around the guides without any interpolation.
- Interpolate Between Two Guides
- Interpolate Between Three Guides
Barycentric Interpolation Type
The barycentric interpolation type can only be changed when Barycentric guide selection is used.
- Distribution Mesh
The interpolation uses the mesh topology to determine how guides affect the generated hairs.
- Nearest Neighbor
Guide roots are re-triangulated and the result is used to determine the interpolation. This method is slower but gives better results.
- Manual Triangulation
Same approach as above but additional steps are undergone to remove some artifacts. This method is slower but can give better results than Nearest Neighbor and should be used by default. It preserves better the shape of the hair in relation to the guides used for interpolation.
[Interpolation Type Examples]