 Merge Strands
Overview
Merge Strands takes two or more input hair or guide objects and combines them into one object. This can be useful when you have two grooms which are generated and styled separately on the same character, which you want to become a single groom without losing the creation history.
Note: Merging assumes that all input strands have been planted onto the same distribution surface.
Merging grooms
The Merge operator is simple to use. Add the Merge operator at the level of the stack where you want to merge the two objects.
In this example the merged object will not be affected by the operators applied before it: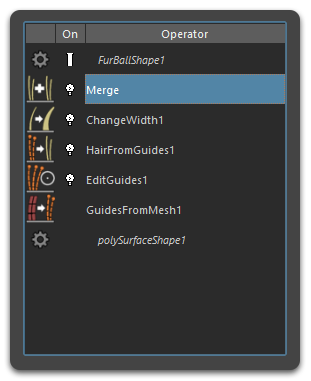
In this example the merged object will be affected by the operators applied after it. For instance, the Change Width operator will affect the strand width of all the merged hair objects: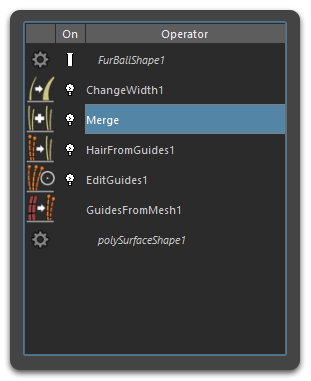
In the Merge operator, click the Add or the button and then click on a hair object in the viewport to add it to the Merged Strands list. In the following image, two hair objects have been added to the Merged Strands list: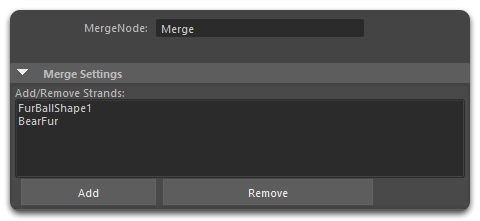
Working with Sub-Grooms
Sometimes it makes sense to divide up a complex groom into multiple parts. Each sub-groom can be edited easier and quicker in isolation, hair within each sub-groom can have a completely different operator stack, some sub-grooms may be animated while others remain static, etc. Ornatrix for Maya enables this workflow by allowing you to merge these sub-grooms, each existing as a separate shape in the scene, into one groom shape.
Merging Existing Sub-Grooms
Follow these steps to merge existing sub-grooms:
- Create or open a scene containing multiple Ornatrix groom shapes on the same base mesh, for example on the same character.
- Select one of the sub-grooms and add a Merge operator at the top of the stack.
- In the Merge operator click the Plus button to select the other shape in the select dialog. Hide the second groom.
- Both sub-grooms are now part of one groom, however, we have a problem. The grooms overlap.
Handling Overlapping Strands
The Merge operator provides options for handling overlapping strands:
- Change the Overlap Resolution option to "Remove". Note how the overlapping hair is gone.
- You may need to adjust the Distance Threshold parameter to get the correct result.
- There is still a sharp transition between the two merged grooms.
- Change the Overlap Resolution option to "Blend". Now the sub-grooms are smoothly merged together and the sharp transitions are gone.
As with almost all things in Ornatrix, the merging is fully procedural and non-destructive. You can modify the groom below or above the merge point at any time.
Creating a New Main Groom
You can also create a separate main groom and merge sub-grooms into it:
- Create a default Fur Ball on top of the same character.
- Remove all operators except Guides from Mesh and Hair from Guides and change the strand counts to 0, to get an empty hair groom.
- Add a Merge operator.
- Use the plus button to add the other sub-grooms as described above.
This workflow is especially useful for complex character grooms where different parts (e.g., eyebrows, facial hair, scalp hair) need to be worked on separately before being combined.