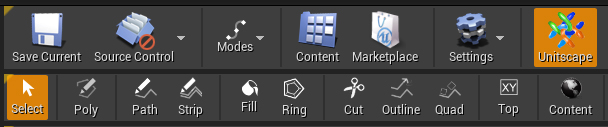
Main Toolbar
Please note that all of the tools listed here are still under heavy development and subject to frequent changes.
The main toolbar can be toggled by clicking the Unitscape Icon in Unreal Editor's top toolbar, doing this will also activate the Unitscape editor mode.
For better precision we recommend using the shape tools in top view.
- Select : Deactivates any tool, so that you may select objects in the scene.
- Poly : Activates the Polygon Tool which enables basic poly shape drawing mode.
- Path : Using the Path Tool is the easiest way to quickly create a path in your scene.
- Strip: The Strip Tool offers a more precise way of creating paths allowing you to specify exact point placement, which can be useful when tracing existing blueprints.
- Fill: Fill Tool allows you to place "fill anchors" in the scene which will override the shape settings (i.e. instancing settings) at the location the "anchor" is placed .
- Ring: The Ring Tool will create a child-shape of the shape you are currently hovering over, creating an evenly shaped hole in the parent polygon.
- Cut: The Cut Tool will simply cut a shape in two pieces (more precisely it will create two new child shapes at the location of the cut overriding the parent shape).
- Outline: Outline Tool allows creating a shape along the borders of any polygon or path. Note that this tool is currently still under heavy development.
- Quad: Using theQuad Tool you can place quads in the layout that are automatically aligned to the closed polygon border and are automatically resized to fit the currently used Instance Set
- Top: Toggles between top and perspective view
- Content: Opens the Unitscape Content Browser
Here is a video showing basic tool usage:

Missing Something? Let us know if this page needs more information about the topic.