


Groom Optimization
Optimizing a groom is mostly about avoiding unnecessary work.
A simpler groom is faster to edit, simulate, and render. Since most operators in the groom stack are recomputed whenever upstream data changes, decisions made early in the stack can have a large impact on performance.
The following techniques can help reduce unnecessary computation while preserving the appearance and behavior of the groom.
Root Distribution
One of the first ways to optimize a groom is to carefully choose the surface where the hair will be generated.
For human hair, it is usually better to extract a dedicated scalp mesh instead of generating hair from the entire head or body. The scalp can include a few extra polygons around the hairline for areas such as baby hairs and sideburns.
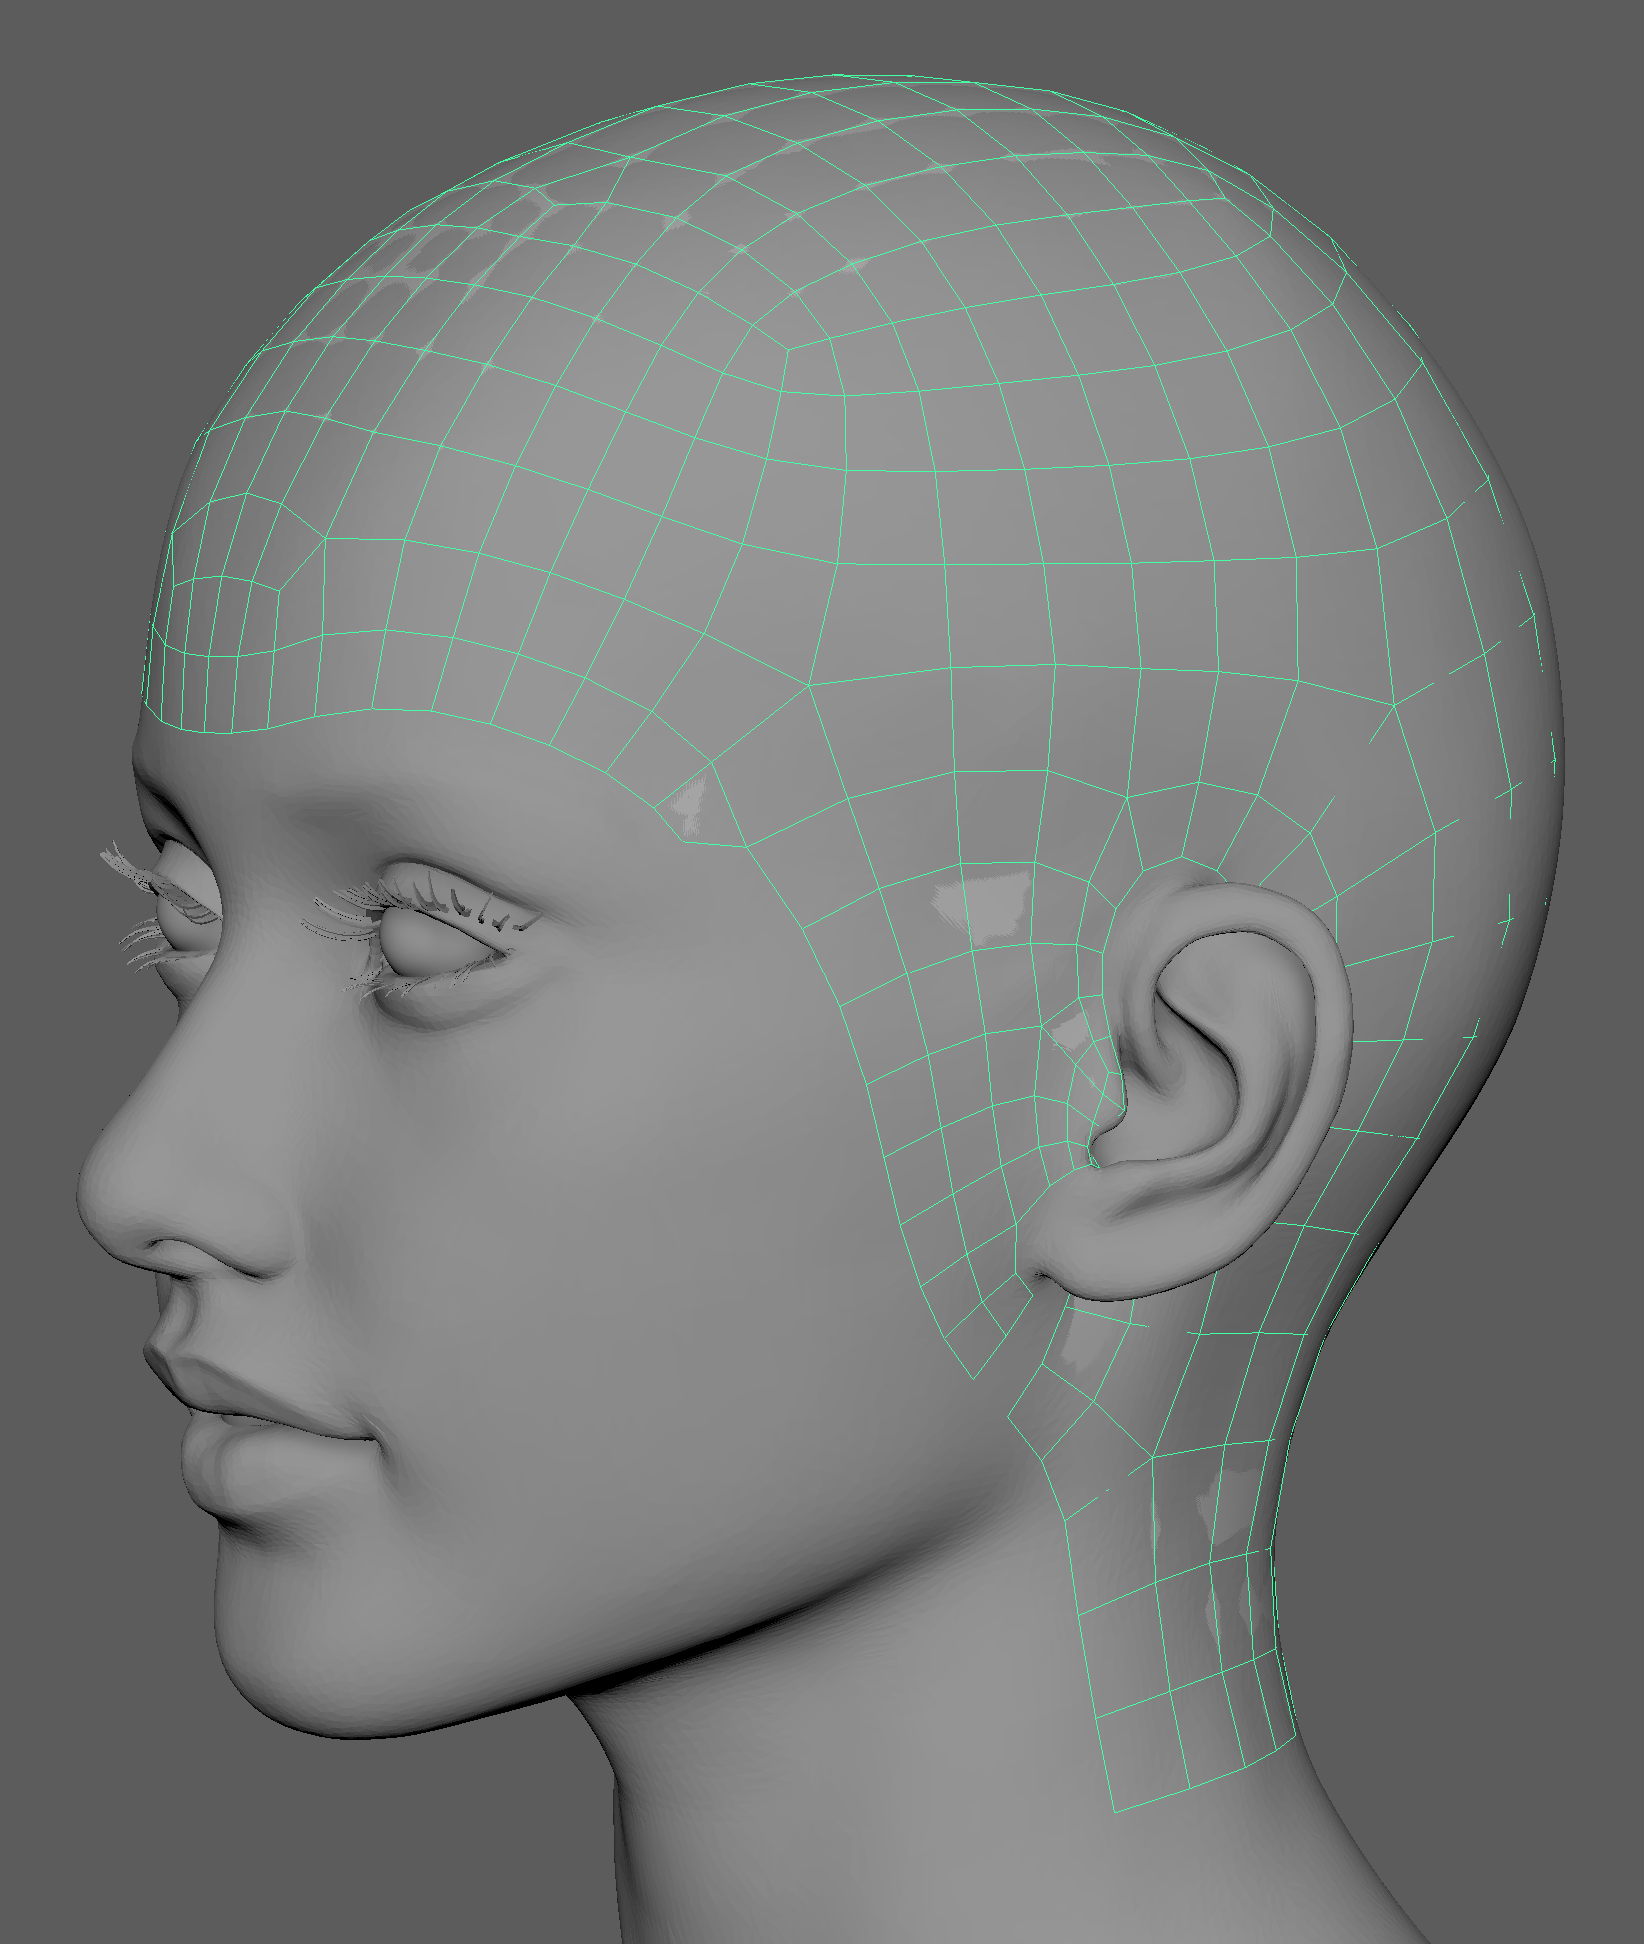
Hair can also be generated from a polygon selection instead of a separate scalp mesh.
Using a smaller generation surface gives operators such as Guides From Mesh and Hair From Guides a smaller area to process. It also helps produce a cleaner and more controlled root distribution and hair interpolation.
A separate scalp can also improve performance on animated characters. If the groom is attached directly to a very dense deforming character mesh, Ornatrix still needs to evaluate that surface as the character animates. Using a lighter scalp mesh reduces the amount of geometry involved in that evaluation.
By contrast, generating hair over a large surface and then removing unwanted areas using a distribution map can be unnecessarily expensive.
For example, if hair is generated over the entire torso but only a small area is actually needed, Hair From Guides still needs to compute the entire mesh and distribute roots over the full surface before the distribution map removes the unwanted strands.
Whenever possible, limit the generation area from the beginning.
Root Distribution on Animals
The same approach can be used for fur and animal grooms.
Instead of generating fur over the entire mesh, use polygon selections to restrict the areas processed by each groom.
For very dense animals, it can also be useful to split the groom into smaller sections, such as:
- Head
- Body
- Belly
- Legs
- Tail
Each section can then be groomed, optimized, simulated, and rendered independently.
At the end of the stack, the different sections can be combined using the Merge operator. This allows the final groom to behave as a single result without visible seams between the different parts.
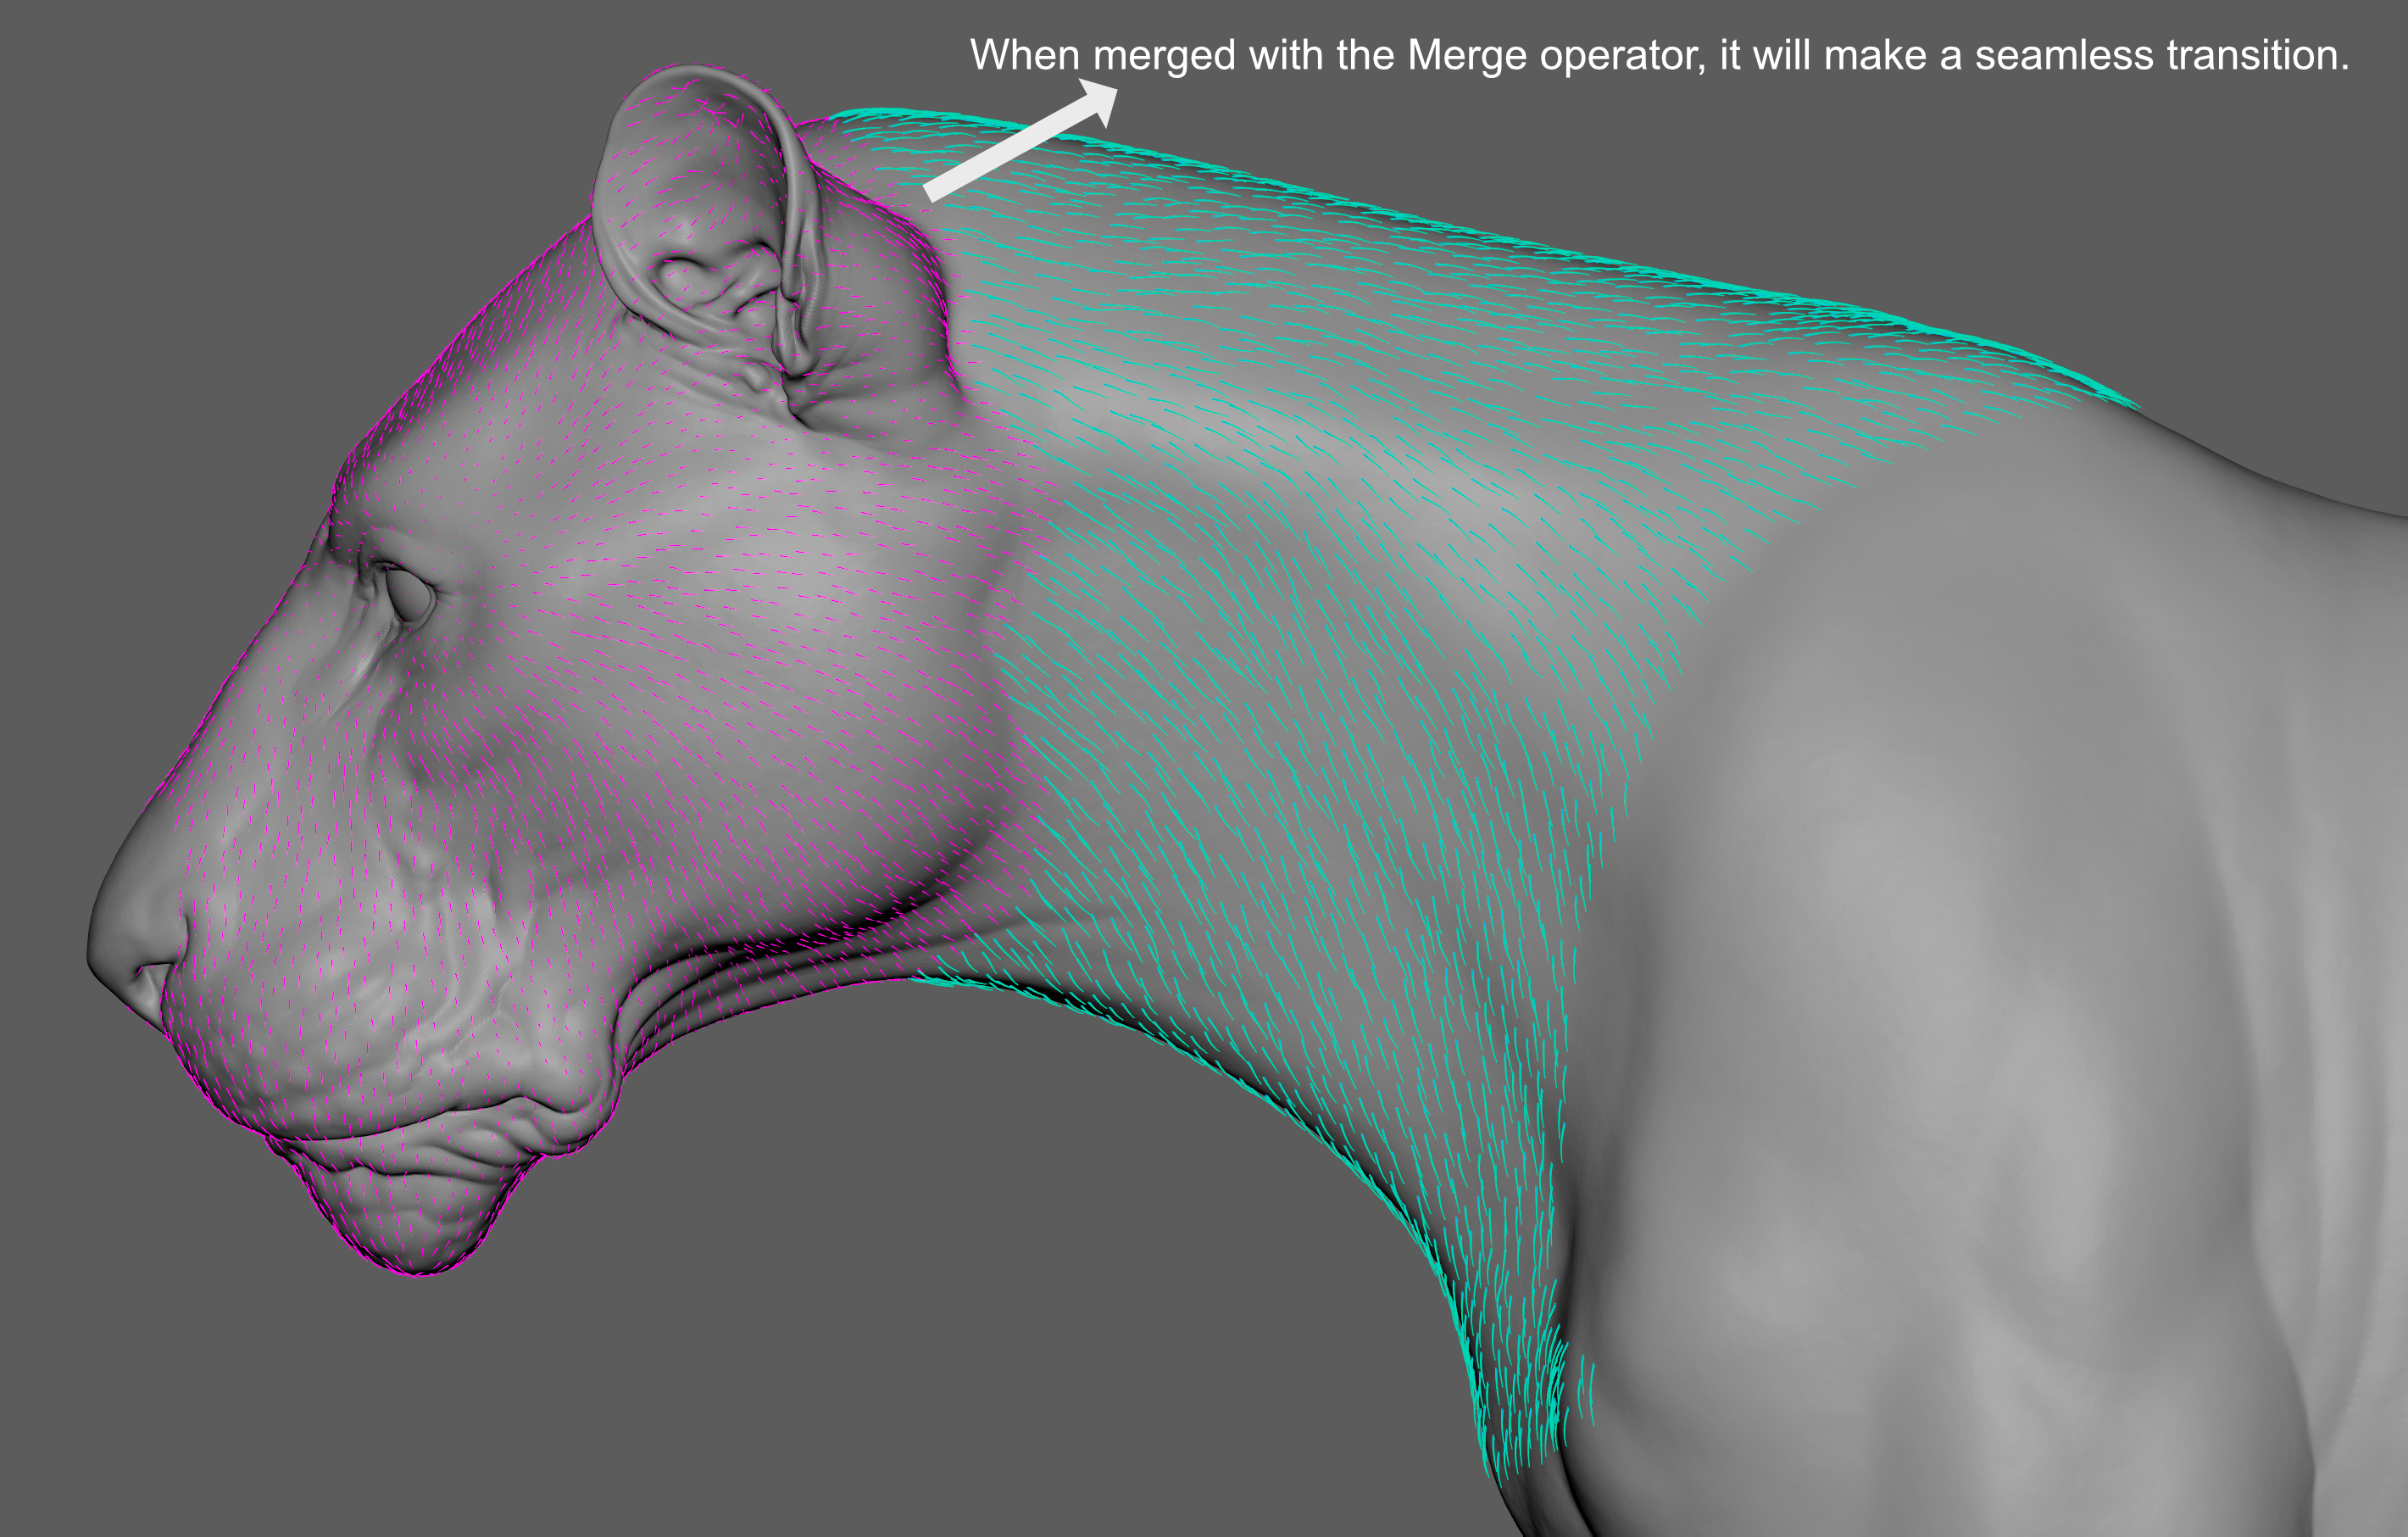
This approach is especially useful for large or very dense creatures where different parts of the groom may have different simulation, rendering, or shot requirements.
Reusing Root Layouts
For productions with multiple human characters, it can be useful to reuse the same optimized scalp and root distribution.
For example, you can create a simple groom containing only the scalp and root distribution required by your characters, save it as a graft, and reuse it as a starting point for multiple grooms.
The following is an example of root placement that works well for simple grooms: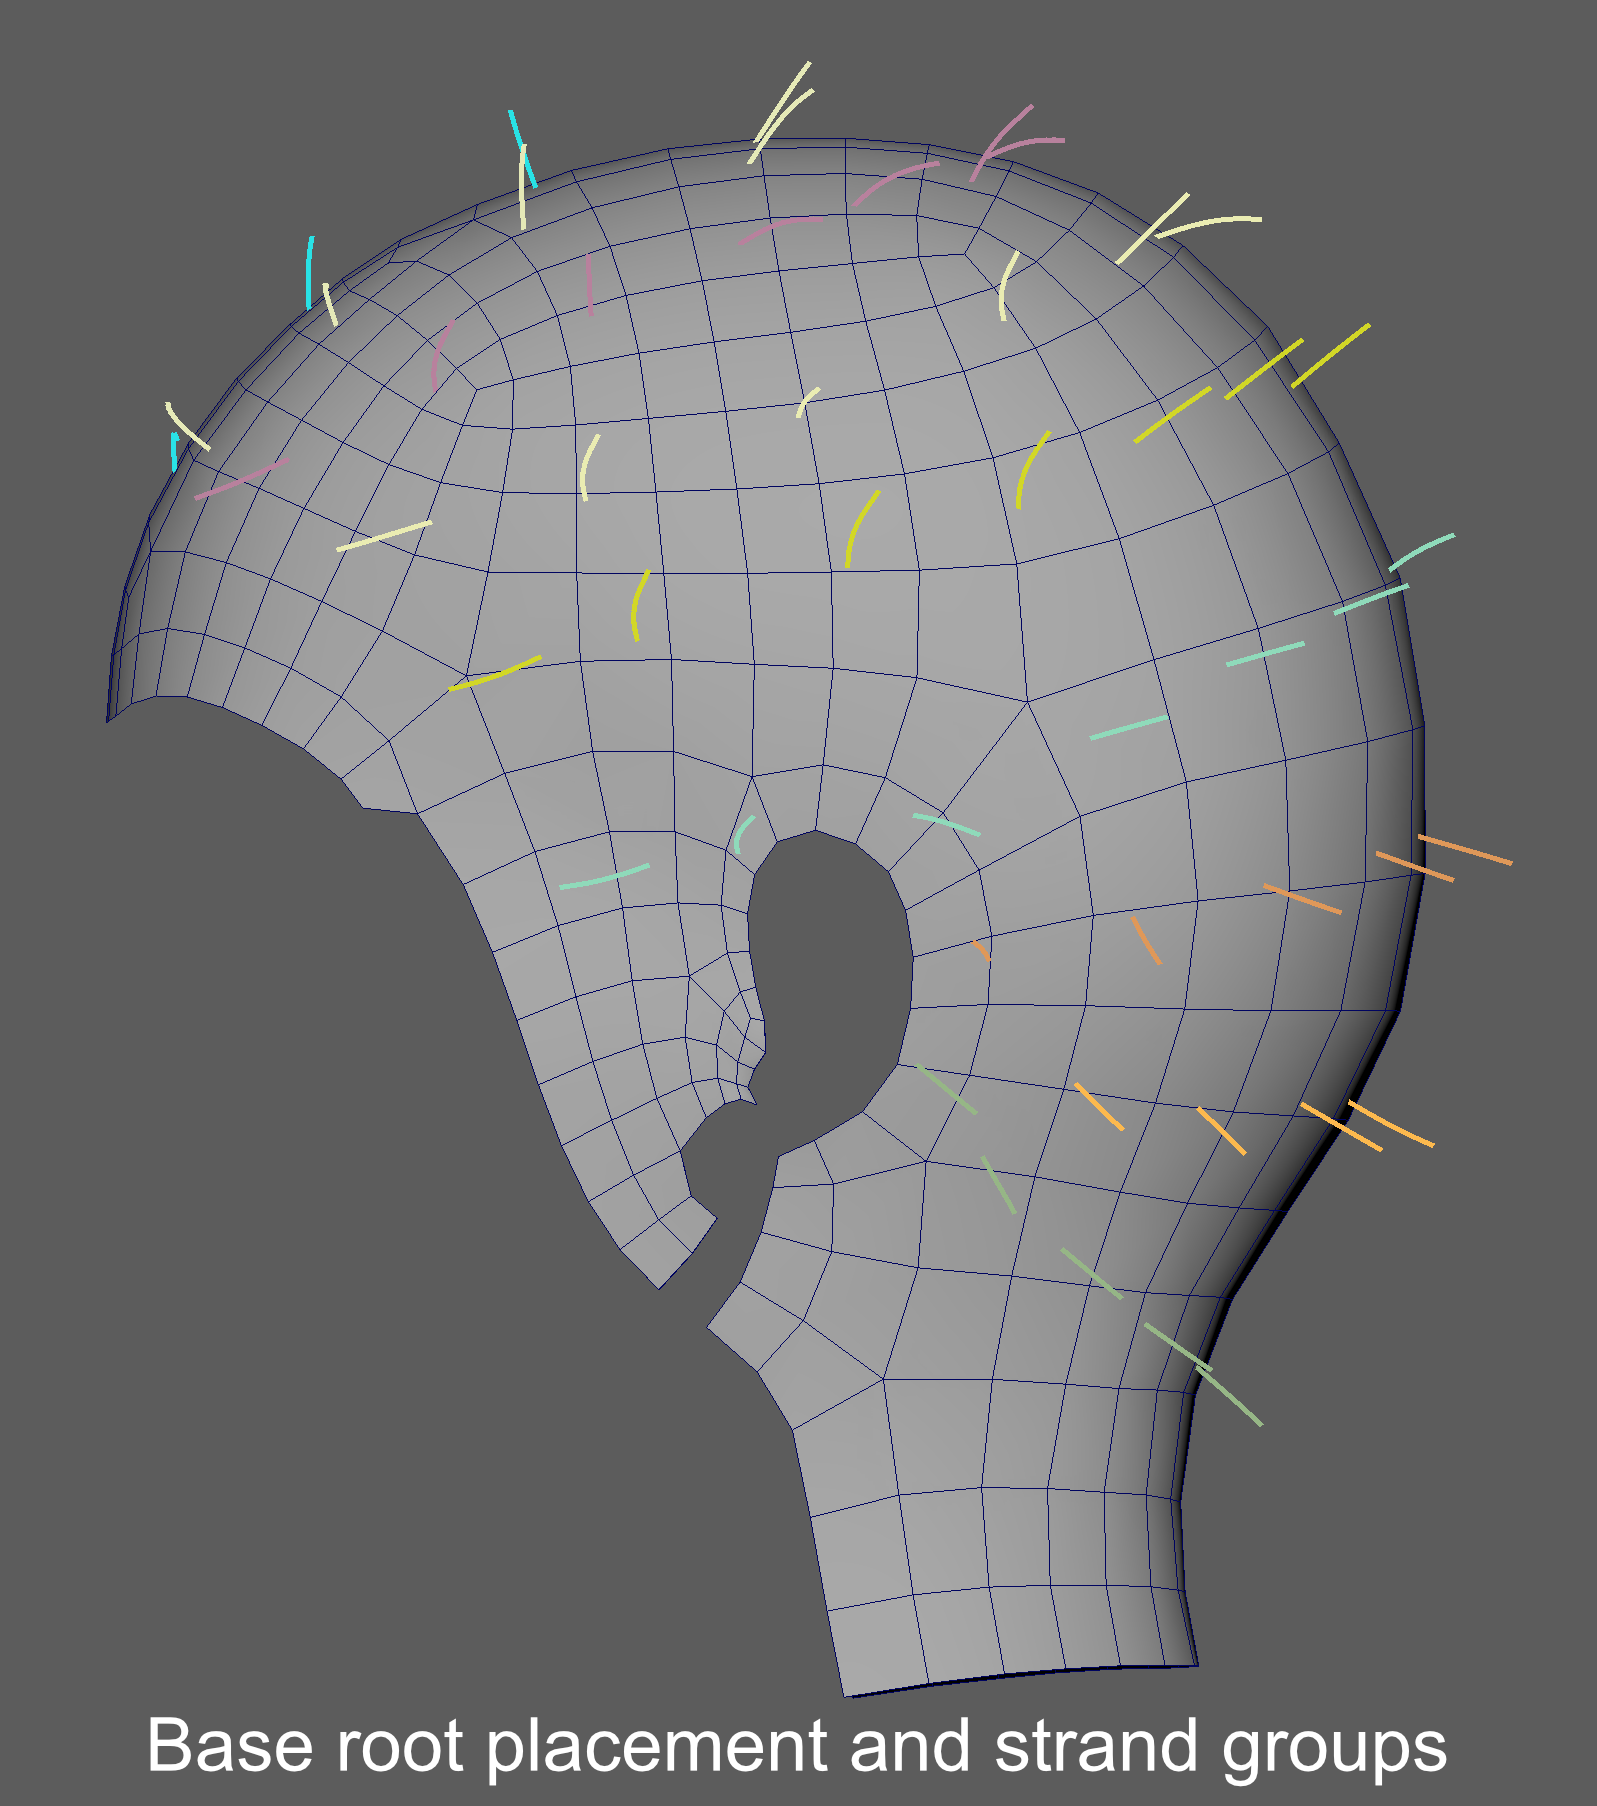
This can be used as reference to what Hair From Guides expects for optimal interpolation.
See our Groom Graft tutorial on Youtube to learn how to prepare you reusable graft: Procedural Eyebrow Graft Groom
This avoids rebuilding the same root layout for every character and helps maintain a consistent starting point across a production.
Guide Distribution and Interpolation
Guides From Mesh scatters guide roots over a surface.
When building a groom, it is usually better to start with the minimum amount of detail required and add more only when it becomes necessary.
This applies both to the number of guides and to the number of points in each guide.
Add Detail Only When Needed
A good example is creating dreadlocks using twist.
Instead of starting with high-resolution guides, begin with a low point count, such as the default 10 points per guide.
Use Edit Guides to shape and groom the hair while the guides are still lightweight.
Once the main shape is finished, add a Detail operator to increase the point count before applying the twist effect with Clump.
Procedural Dreadlocks
This keeps grooming and simulation lightweight and interactive, while the additional points required for the dreadlock detail are added only when they are needed.
A typical stack could look like this:
- Clump - Add the twist used to create the dreadlock effect.
- Detail - Increase the point count.
- Edit Guides - Shape the hairstyle.
- Guides From Mesh - Create low-resolution guides.
This approach keeps the working groom simple and leaves the higher-resolution detail for the final result or render.
Use Only the Guides You Need
Guides From Mesh and Hair From Guides already use root distribution algorithms designed to create well-spaced and predictable strand layouts.
When guides are generated procedurally with Guides From Mesh, start with as few guides as possible while still defining the desired hairstyle. Hair From Guides can then interpolate the final hair between those guides.
Problems are more likely to appear when guide roots are placed manually, for example with Edit Guides, or when guides are created from imported curves.
If several guide roots share the same position or are placed too close together, Hair From Guides may have difficulty producing a clean interpolation. This can result in uneven density, unexpected interpolation, or visible bald areas.
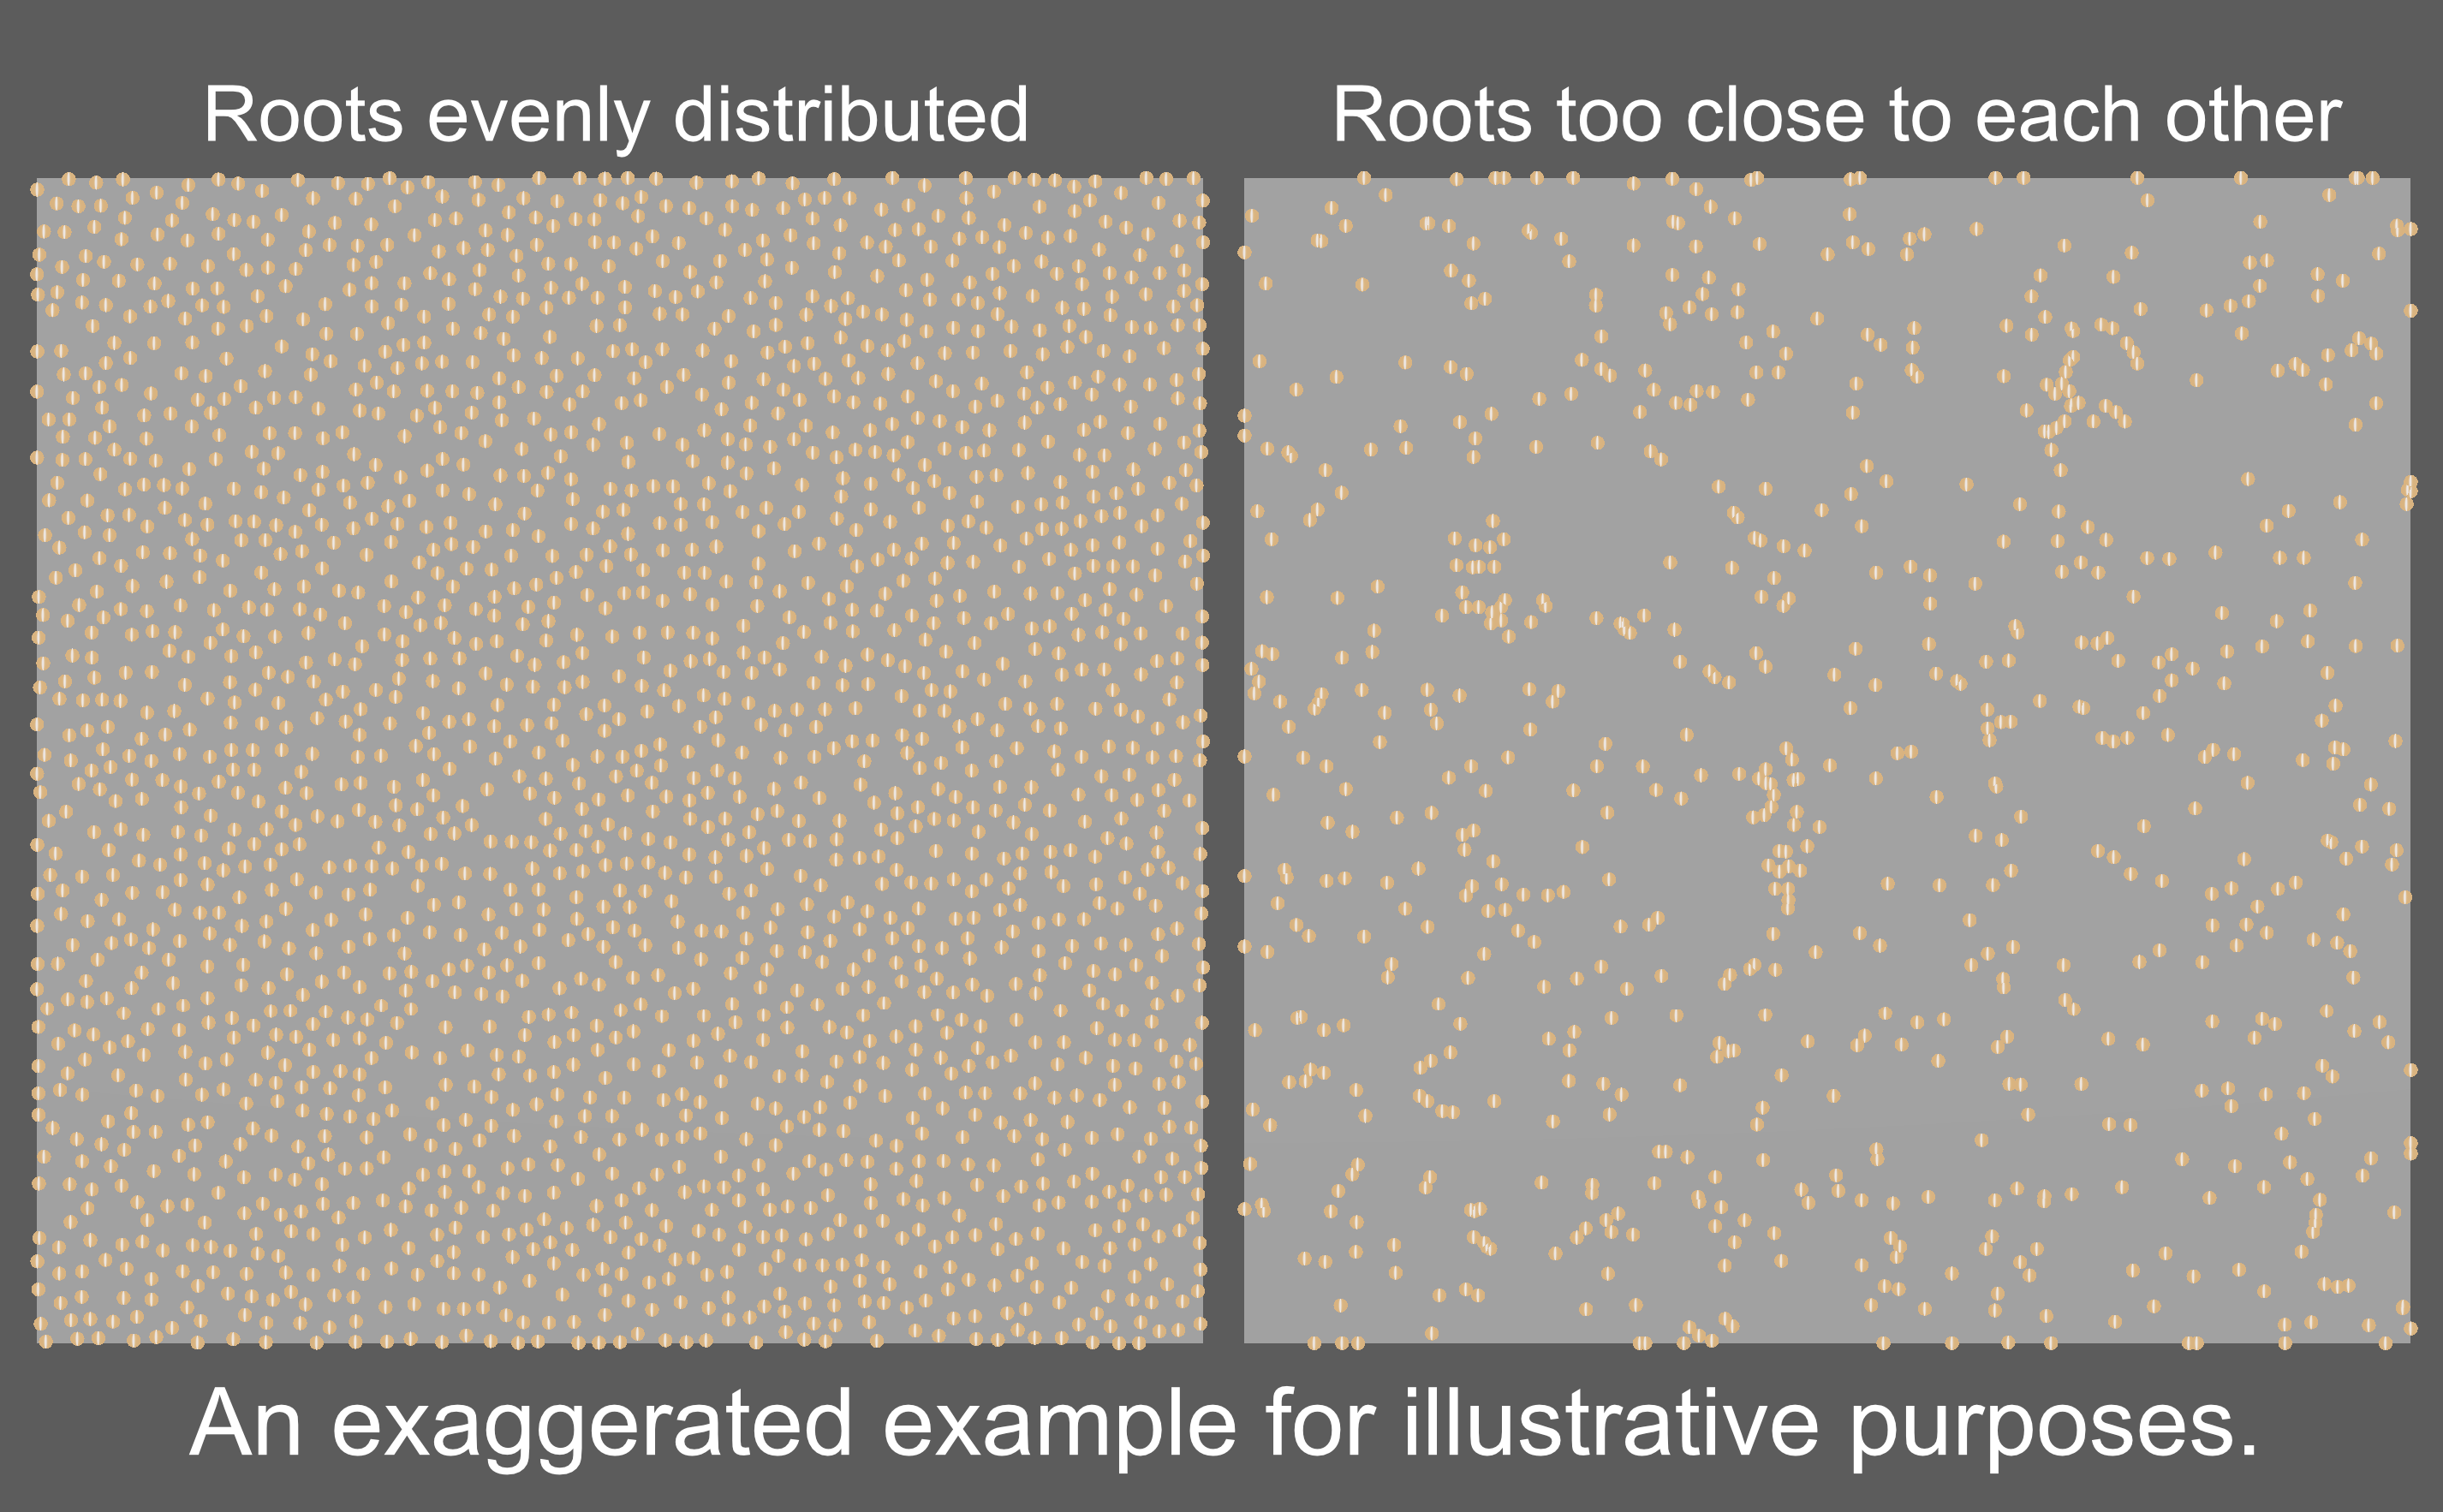
When placing guide roots manually:
- Use only the number of guides required to define the hairstyle.
- Avoid placing multiple roots at the same position.
- Avoid clusters of roots that are unnecessarily close together.
- Keep the root distribution reasonably even whenever possible.
A clean guide layout gives Hair From Guides better information to interpolate from, producing a more regular and predictable result.
Manually Planted Guides
You can also plant guide roots manually using tools such as Plant Guides or the Create Brush in Edit Guides.
If all guides are created manually, you can set the guide count in Guides From Mesh to 0.
This leaves Guides From Mesh with no procedural guides to regenerate and avoids unnecessary computation in that part of the stack.
Optimizing Detail By Strand Length
Not every strand needs the same number of points.
This becomes especially important in hairstyles that contain a large variation in strand length.
A fade haircut is a good example. The strands on the sides may be very short, while the strands on top can be significantly longer.
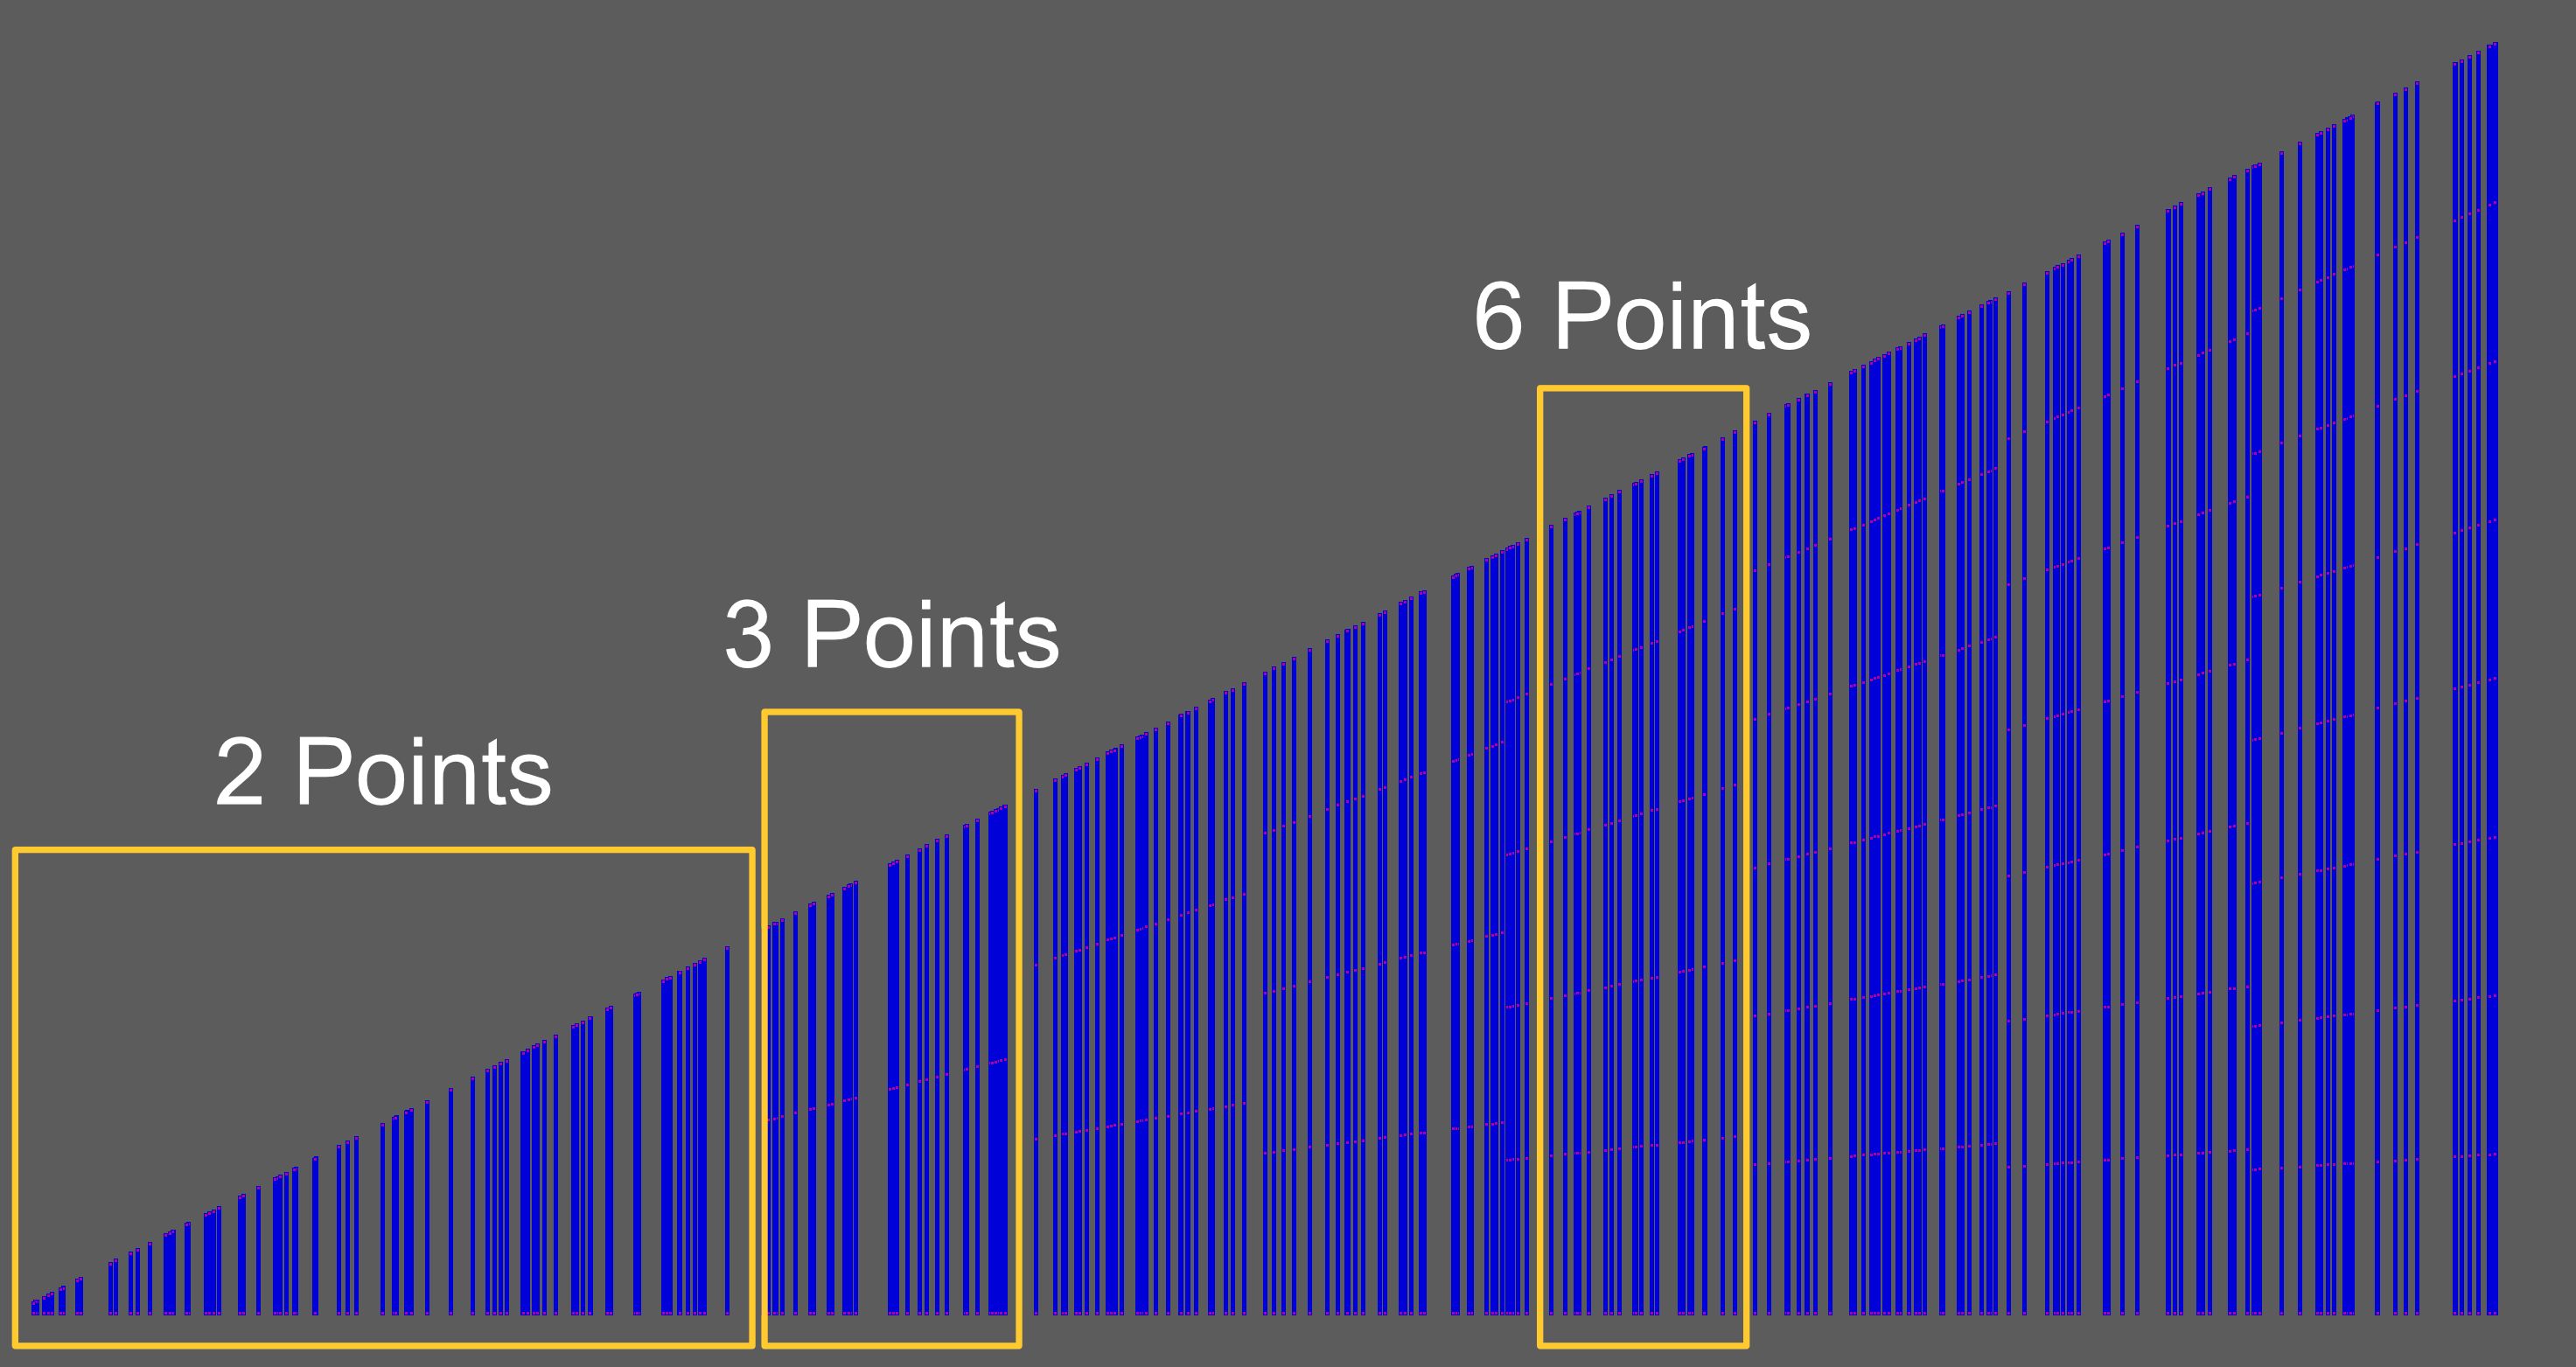
In the example above, the point count increases with strand length. The shortest strands use only 2 points - the root and the tip - and longer strands progressively receive more points.
Long strands need more points to describe their shape and support effects such as curling, frizz, and clumping. Very short strands may need only a few points.
Giving both short and long strands the same high point count wastes geometry and increases the amount of data that later operators must process.
To create this setup:
- Add a Generate Strand Data operator and set the Generation Method to Strand Length. The default settings are sufficient.
- Add a Detail operator and assign the generated channel to Point Count Channel.
The point count will then vary automatically based on strand length, giving short strands fewer points and long strands more.
This is especially useful for dense hair and fur, where reducing the point count on short strands can significantly reduce the total amount of geometry.
For more information about generating strand channels, see Generate Strand Data.
Using Strand Length for Groom Effects
The same Strand Length channel can also be reused by other operators.
For example, short strands naturally tend to show less visible frizz, curl, or clumping than long strands.
A Strand Length channel can therefore be used to gradually reduce these effects as the strands become shorter.
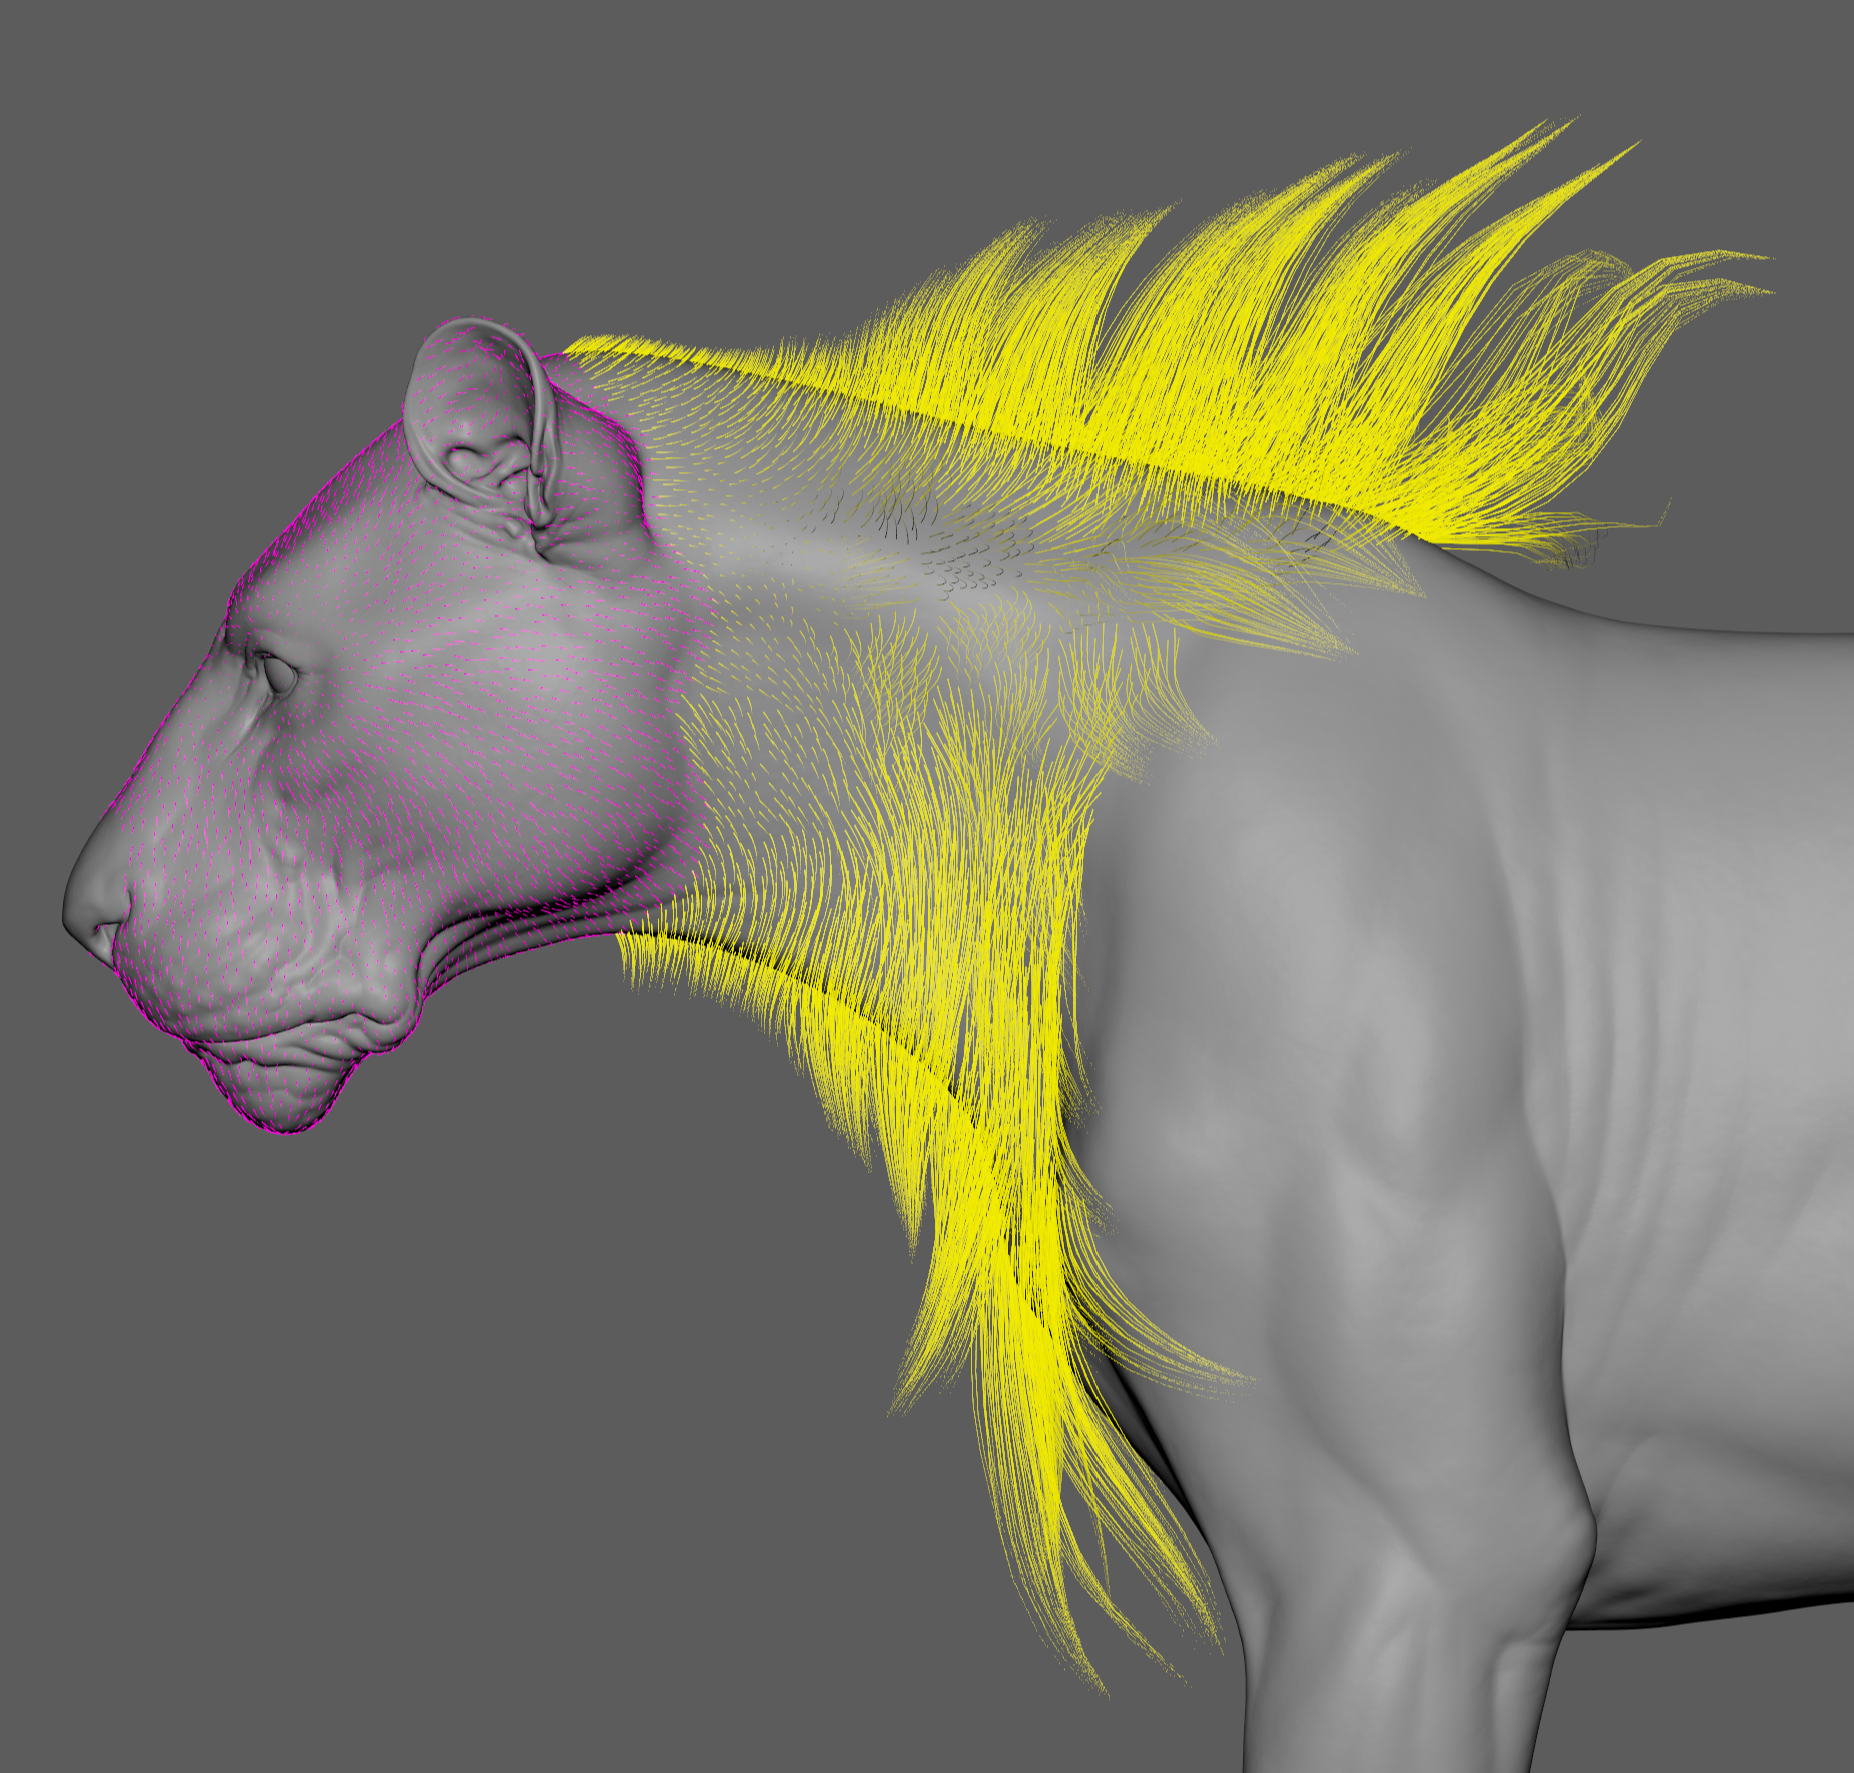
The following example uses the Strand Length channel to gradually reduce the clump amount. Shorter strands receive less clumping, while longer strands remain more strongly clumped:
The same channel can also be used to control the frizz amount, reducing frizz on shorter strands and increasing it progressively on longer strands:
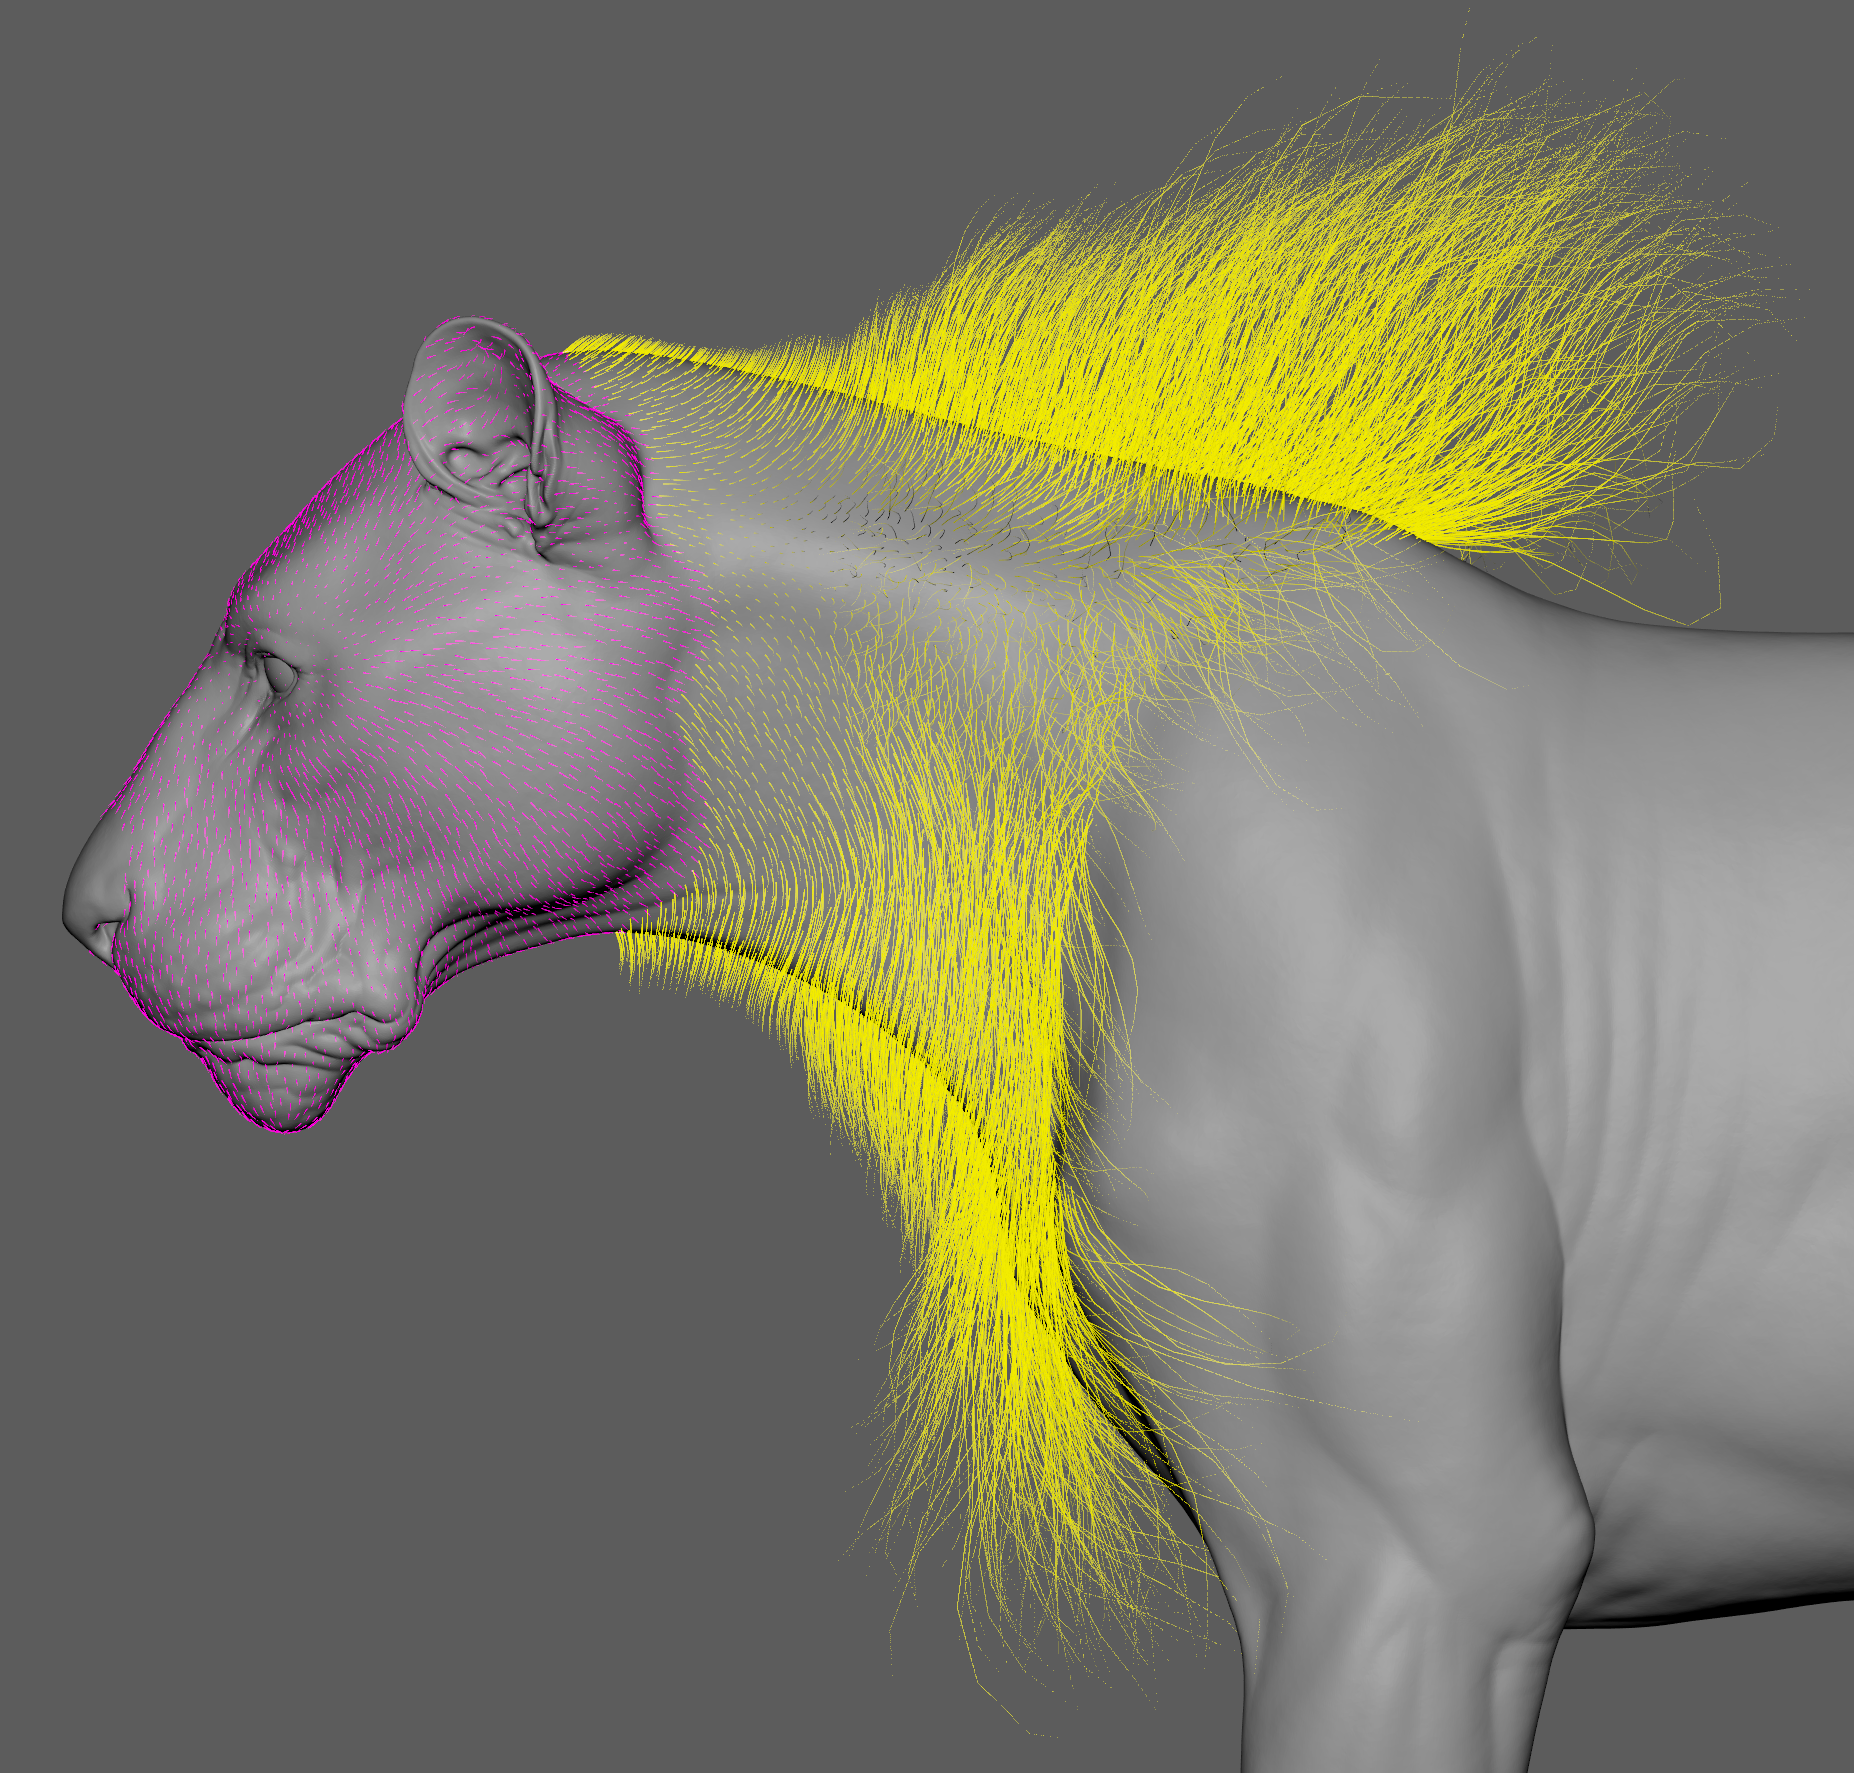
This can produce a more natural result while also avoiding unnecessary processing in areas where those effects would not be visually noticeable.
Using Strand Length for Simulation
Length-based channels can also be useful for simulation.
Short strands generally have less room to bend and move than long strands, so they often do not require the same simulation detail.
The Strand Length channel can be used to:
- Reduce point count on short simulated strands.
- Increase stiffness as strands become shorter.
- Reduce the effect of wind on shorter strands.
- Keep longer strands more flexible and detailed.
This can reduce simulation cost while producing behavior that better matches the physical differences between short and long hair.
Camera Distance LOD
Generate Strand Data can also be used to build a camera-based LOD system.
Use the Strand Distance To Object Generation Method to create a per-strand channel based on the distance between each strand and the camera.
Because Strand Distance To Object works with mesh objects, the camera cannot be used directly. Create a small helper mesh, parent it to the camera, and use that mesh as the target object.
See Getting Distance To Non-Mesh Objects in Generate Strand Data for setup instructions.
The same channel can then drive several parts of the groom:
- Detail - Reduce the number of points per strand as the camera moves farther away.
- Change Width - Increase strand width at greater distances to help preserve the appearance of hair density.
- Hair From Guides - Reduce the amount of generated hair as the camera moves farther away.
These optimizations can be combined.
As the groom moves farther from the camera:
- Fewer strands can be generated.
- Each strand can contain fewer points.
- Strands can become slightly wider to compensate for the reduced hair count.
This allows the groom to progressively use less geometry at greater camera distances while maintaining a similar overall appearance.
Viewport and Render Density
The groom does not always need to use its final render density while you are working on it.
Hair From Guides can display only a fraction of the final generated strands in the viewport while keeping a higher strand count for rendering.
During grooming and animation, use a lower viewport density that still gives you enough information to judge the shape of the hair.
Increase the final hair count only for rendering.
This can make a large difference in dense hair and fur because fewer strands need to be generated, displayed, and processed interactively.
The same principle applies to strand resolution.
The Detail operator can use different point counts for the viewport and final render. This allows you to work with lightweight strands while keeping the additional resolution required for the final image.
A useful workflow is:
- Keep the viewport strand count and viewport point count low while grooming.
- Use the final strand and point counts for rendering.
- Test the final settings periodically to make sure the result remains consistent.
There is usually little benefit in displaying the complete render groom during every grooming operation.
Optimizing By Shot Using Strand Groups
Not every part of a groom is equally important in every shot.
Strand Groups can be used to divide a groom into logical regions and process only the areas required for a particular shot.
For example, a long hairstyle could be divided into groups for:
- Front hair
- Back hair
- Left side
- Right side
- Bangs
- Flyaways
For a close-up where only the front of the character is visible, expensive simulation or additional detail may only be necessary for the front-facing groups.
This is particularly useful for:
- Simulation
- High-resolution Detail
- Secondary motion
- Shot-specific corrections
Instead of processing the entire groom, each shot can focus computation only on the strands that contribute to the final image.
For example, Moov can simulate only the strands in a selected Strand Group, reducing the amount of data processed and simulation time.
Simulation Optimization
Hair simulation can become expensive very quickly because the solver needs to process every simulated strand and every point along those strands over time.
The most important optimization is to simulate the simplest representation that gives the required motion.
Simulate Guides Instead of Dense Hair
Whenever possible, simulate the guides instead of the final dense hair.
The guide animation can then be transferred to the render strands using Hair From Guides.
This allows the simulation to process hundreds or thousands of guides instead of potentially thousands or millions of final strands.
It also makes configuring and previewing the simulation much more interactive.
For a practical example using Moov, see Moov Hair Simulation.
Keep Simulation Resolution Low
Simulation does not always need the same strand resolution as the final groom.
Use only enough points to reproduce the motion and bending required by the hairstyle.
Additional points can be added after the simulation using a Detail operator.
For example:
- Simulate guides using a relatively low point count.
- Add Moov to simulate those guides.
- Add Detail after the simulation to increase strand resolution.
This produces smoother final strands without forcing the simulation to process the additional points.
The Strand Length technique described earlier can also be useful here. Short simulated strands can contain fewer points than long strands instead of giving every strand the same simulation resolution.
Use Simplified Collision Meshes
Collision geometry usually does not need the same resolution as the rendered character.
Use a simplified collision mesh that represents the general silhouette required by the hair.
Reducing the polygon count of collision objects gives the simulation less geometry to process.
Closed collision meshes are also preferable when possible because open borders can create areas where strands may become trapped or pass through the surface.
See Moov Hair Simulation for a complete simulation example including guide resolution and collision setup.
Bake Finished Simulations
Once a simulation is approved, consider baking it using Animation Cache instead of recalculating the solver every time the scene is evaluated.
This allows the recorded animation to be reused without running the simulation again.
If the cache is created from guides, the cached guide motion can continue to drive the final dense hair through Hair From Guides.
When caching hair that uses different viewport and render densities, make sure the intended representation is being recorded.
For more information, see the Animation Cache section in Moov Hair Simulation.
General Guidelines
A few simple rules apply to most groom optimization tasks:
- Limit the generation surface to the area where hair is actually needed.
- Use the minimum number of guides required to define the hairstyle.
- Keep guide roots cleanly and evenly distributed.
- Avoid adding strand points before they are needed.
- Place high-detail operators as late in the stack as possible.
- Use lower viewport density and resolution while working.
- Use camera-distance channels to reduce strand count and detail when the groom is farther away.
- Use Strand Groups to limit expensive operations to the strands required by a particular shot.
- Simulate guides instead of dense render hair whenever possible.
- Keep simulated strand resolution only as high as required for the desired motion.
- Use simplified collision geometry.
- Bake finished simulations when they no longer need to be evaluated interactively.
- Split very large grooms into smaller logical sections when this makes them easier to manage.
The goal is not simply to reduce strand count or point count. The goal is to avoid spending computation on data that does not contribute to the final image.