


 Hair from Mesh Strips Object
Videos
Overview
Hair From Mesh Strips object allows you to use "flat" polygon meshes to generate hair along their surface. Hairs are generated from one edge of a mesh strip towards the opposite edge. The edge from which the hairs start growing can be specified manually per each strip, however, the hairs will be generated along the longest boundary of a mesh strip by default.
The polygon strips can be deformed, moved, or edited inside the scene and the Hair From Mesh Strips object will automatically adapt to these changes. You may use multiple strip objects, have one strip object with multiple strip elements, or have a combination of these options.
Creating Hair From Strips
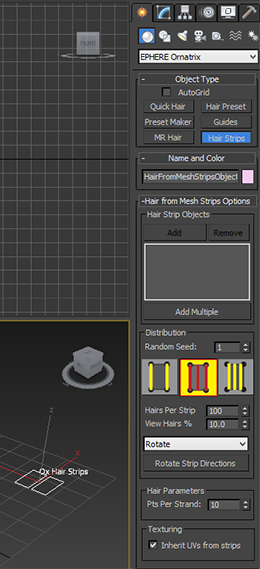
To create hair from strips go to Create panel, choose Geometry, and then choose EPHERE Ornatrix from the drop down categories. Click on Hair Strips button and then click inside a viewport to create the strips object.
If you also have strip objects inside the scene you can click on Add button and select the object. Alternatively, you may want to select multiple objects at the same time. To do this click on Add Multiple button and then pick your strip objects from inside the scene.
Once strip hair is generated you may use any other procedural modifiers such as Curling Modifier, Render Settings Modifier, Frizz Modifier, and others for refining its shape.
Strip Mesh Requirements
The polygon meshes defining the hair strips must meet a few requirements to properly generate hairs:
- The strip mesh cannot contain triangles, especially not along any of its boundaries
- It is highly recommended that the strip mesh have four boundaries. This means that there are a total of four edge loops going along the circumference of the strip mesh.
- The strip mesh cannot be convex. In fact only flat, single-sided, meshes are acceptable.
Modifying Strip Meshes
After you have added one or more strip meshes into the hair from strips object you may use standard 3ds Max modifiers to edit them. The editing can include both geometrical and topological changes. If you change the mesh topology, however, please make sure that you do not break any aforementioned mesh requirement rules.
Strips Sub-Object Mode
There is a sub-object mode which allows you to select individual strips. Any changes to orientation of the strips will only be performed on the currently selected strips. The arrows at the tips of the strips indicate which direction strip hairs will be generated.
Please note that you must turn off Show End Result option in the modifier stack to be able to see this sub-object mode inside the viewport.
Parameters
Hair Strip Objects
- Strip List
Contains a list of all strip meshes participating in hair generation. Use Add and Remove buttons to pick and remove strips individually. Use Add Multiple button to add multiple strips from the scene at the same time.
Distribution
- Random Seed
Specifies the seed value used when generating strips using random distribution. - Distribution Type Buttons
- Per-Vertex distribution will generate one hair per each boundary vertex of the strip mesh
- Uniform distribution will generate hairs along the boundary at evenly spaced intervals
- Random distribution will generate hairs along the boundary at randomly spaced intervals
- Hairs Per Strip
Specifies the number of hairs to generate on each strip mesh - View Hairs %
Specifies the percent value of hairs per strip to show inside the viewport. You may want to set this to a lower value if you want to render plenty of hair but want to preview only a few of it inside the viewport. - Rotate Operation Drop Down
Specifies the type of rotation which will be performed when you click the Rotate Strip Directions button below this control. If inside the strips sub-object mode, this button will only affect selected strips. Otherwise, all strips will be affected.- Rotate option will rotate the strip orientation
- Flip will reverse the orientation of each strip
- Flow up, down, left, right, back, forward options will make the strip orientations choose each of the respectively selected directions.
Hair Parameters
- Pts Per Strand
Specifies the number of segments to generate in each hair strand
Texturing
- Inherit UVs from Strips
If turned on, this option will make the resulting hair have the same texture coordinates as the strip from which it was generated. This is useful for applying custom texture maps to the generated hair.
C++ SDK Access
This object is accessible via Ornatrix C++ SDK. You need to get an instance of HairFromMeshStripsFPInterface which exposes numerous methods:
#include "HairFromMeshStripsFPInterface.h"

// Get Surface Comb interface
auto bakedHair = HairFromMeshStripsFPInterface::GetInterface( myObject );
MaxScript Access
Get access to the underlying hair object which can be manipulated and edited using the MaxScript Hair Interface:
myHair = hairFromMeshStrips.GetHair()
myHair.SetNumRoots 50
Control mesh-strip hair generation:
/* Add a hair strip object from the scene
stripObject Strip mesh object
returns true if success */
added = hairFromMeshStrips.AddStripObject stripObject

/* Remove a hair strip object
index Index of the object from the list
returns true if success */
wasRemoved = hairFromMeshStrips.RemoveStripObject index

/* Forces all hairs to be re-generated on next request or viewport redraw. Useful if some internal parameter was changed directly. */
hairFromMeshStrips.InvalidateMeshStrips()
Examples
You can find examples on usage of this object by examining the unit tests in Test_HairFromMeshStripsObject.ms.