Mesh from Strands
Overview
This operator converts strands of hair into a mesh shape. It can be used in conjunction with the Render Settings operator, which can specify hair radius and shape, as well as the Rotate operator which specifies strand twisting.
Use this operator to render or bake the geometric representation of the hair, to create feathers, and to scatter and fit various scene objects along the hair shape. You can also use this operator with Guides from Guide Mesh operator for cloth-based simulation and Hair from Mesh Strips operator for generating and baking hair textures.
There are a number of parameters that control mesh creation and shader assignment.
|
Using Mesh from Strands with Rotate operator |
Output mesh types
There are three main types of meshes that can be generated from hair:
- Cylindrical hair can be rendered from all angles, great for high quality hair

Prismatic meshes are cylindrical N-sided structures that encapsulate each strand. Because they can be viewed from all directions they can be rendered as they are or collapsed into baked meshes. This is often the best choice for strands that demand quality over quantity. Some examples include cat whiskers and brush bristles. Rendering very thin cylindrical hair usually causes artifacts, but these can be fixed with increasing sampling per pixel in your renderer.
Cylindrical hair has to be rendered with one of Maya's shaders (such as blinn or lambert) because the normals are generated away from the surface in a conventional way. - Billboarded hair are fast and cheap to render, great for dense thin hair and feathers
Billboarded hair primitives are faces, one or more per segment, that form flat planes. Since hair in nature is cylindrical, camera-facing billboards fill the task of rendering hair very well. They are quick to generate and render but one downside is that they're not cylindrical and sometimes can't be used for things like whiskers, like the prismatic mesh primitive. Billboarded hair can be oriented in any direction as well as controlled by a map to produce things like grass, feathers, and tree leafs. - Proxy hair use any arbitrary set of objects as hair. Great for scattering applications such as forests or bird feathers.

Proxy mesh-based hair allows you to take any mesh shape(or a set of shapes) in the scene and use it as a strand. Ornatrix will stretch the object along the strand and deform it using the strand's shape. There are options to inherit hair's shape, thickness, orientation, and texture coordinates for any number of arbitrary mesh objects. If multiple objects are added to the list they will be randomly assigned to each strand. This assignment can also be controlled through a seed parameter or a map.
Parameters
Strand Group
Allows you to isolate the effect of this operator by selecting a particular Strand Group created in the Edit Guides operator.
Side Count
Determine the amount of sides in the hair mesh.

Use Tangent Normals
When on, the normals of the mesh will be parallel with the flow of the strands instead of perpendicular to them.
Cross Section Ramp
Use this Ramp curve to manipulate the shape of the hair mesh.

Is Mesh Guide
Use this option to convert guides to mesh, which can be later converted back to guides using Guides from Guide Mesh. This is used to simulate guides as cloth strips and then convert back to guides. This option is automatically enabled when you use the Nucleus Simulation button.
Create Nucleus Simulation
Create a Nucleus simulation and your guides will now be affected by it. Guides from Guide Mesh operator will be added to the top of the operator stack to convert the simulated cloth strips back into Ornatrix guides. A special Nucleus operator will also be present within the stack. Use it to adjust simulation properties.
All operations using Nucleus such as caching and setting of initial shape can now be done with the simulated hair.
Mapping coordinates
MeshFromStrands operator provides a flexible way of controlling the texture coordinates and UV sets of output mesh. These controls are available inside the Mapping Coordinates Attribute Editor group.

- The resulting mesh can contain more than one UV set. Each UV set can have its own unique settings. This is very useful when using blend maps and materials to have textures with varying mapping inside the same mesh. Map Channel Count parameter specifies the number of UV sets to produce.
- Selected Map Channel specifies the 0-based index of the output UV set for which current parameters are applied
- Mapping Type specifies how the texture coordinates are generated for current UV set. You can specify one of these options:
- Per-vertex mapping will generate one UV coordinate at each vertex of the resulting mesh. This is the most detailed way of generating texture coordinates but also uses more memory.
- Per-segment mapping will generate one UV coordinate at each strand segment of the mesh. The UVs will vary along the strand length but not along its width.
- Per-root vertex mapping will generate one UV coordinate at each vertex but only at the root of each strand. This will vary the UVs among strands but not along their length.
- Per-root mapping will generate one UV coordinate at each strand root only. This will vary the texture coordinates between strands only.
- Per-Strand Coordinates option, when on, will generate a complete UV space (going from [0,0] to [1,1]) for each strand. All strands will be able to contain a full texture map on them. This is good for mapping feathers and foliage onto generated strand meshes. When this option is off, the UVs assigned to strands will be determined from the UV coordinates of base distribution mesh and vary along its surface.
- Create Atlas option gives you the ability to create texture island in combination with the previous settings.
- Strand Group Islands will create UV islands based on strand groups created in Edit Guides.
- Coordinate Stretching parameter can add a little stretch offset when varying texture coordinates along the base mesh surface
|
Feather texturing using multiple UV maps and blending |
Using multiple hair shaders
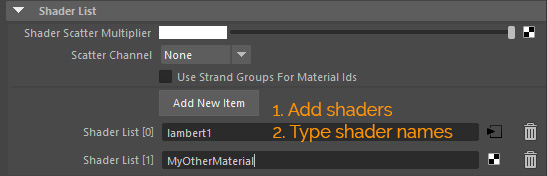
Ornatrix provides a way to control hair shaders on the resulting strand meshes. You can have more than one shader within the scene assigned to different strands. This can be either done randomly or controlled via a strand group, guide channel, or a map.
|
Shader scattering to create feathers |
To use multiple per-strand shaders:
- Expand the Shaders List Attribute Editor group
- Click Add New Item button once for each desired shader
- In the text boxes created below type in the names of Maya materials to use
To control the distribution of shaders among generated strand meshes:
- If parameters are left as default the shaders will be scattered among generated strand meshes randomly
- Use Shader Scatter Multiplier to assign a custom 2d map. This map will control the indices of shaders per each strand based on its grey-scale values and the total number of shaders specified. For example, if there are 5 shaders, black values in the map will result in shader 1 being used, grey values will result in shader 3 being used, and white values will result in shader 5 being used. The map will use the distribution surface texture coordinates.
- Use Scatter Channel drop down to select a strand channel to control the shader assignment to strand meshes. The integer values within the specified channel will be used to determine the shader index to use from the list.
- Use the Use Strand Groups for Material Ids option to make strand groups of each strand specify the shader index to use for its generated mesh