 Fast Raytracer


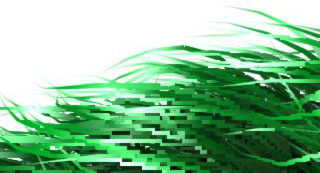
Raytracing with (left) and without (right) self-shadowing
Ornatrix has a built-in ray tracer designed for rendering out hair strands of any thickness. This ray tracer has many customizable parts to it and is dependent upon many parameters. It is generally possible to speed up rendering significantly by tweaking these parameters correctly. This section will describe some of the things that can be done to improve rendering robustness and explain all the necessary details.
The ray tracing, as the name suggests is performed by tracing rays from each pixel in the image to see if they at some point intersect one of the hair segments. If intersection does occur the necessary shading info is extracted from the intersected segments in order to compute pixel color. This intersection tests will be called hit testing. There are millions of pixels to consider for an average rendered frame, and hit testing millions of segments against millions of pixels is simply not realistic. That is why this segment data is organized so it can be retrieved very quickly for any randomly picked pixel in the image.
Ornatrix uses a binary space partitioning (BSP) tree to organize all of its rendering data so it can be accessed quickly during rendering. This BSP tree is built before rendering begins and how it is built and significantly affect render speed. Each leaf node in this tree will hold a certain number of hair segments. The number of segments that each leaf holds corresponds to how many hit-tests will have to be performed for each pixel in the image. The more hit tests, the slower the rendering time. You may control the number of segments allowed in each leaf node.
However, if each leaf node is restricted to hold a very small number of segments (say one or two) and your hair has millions of segments you would end up with millions of nodes created. It can be more computationally expensive to build such a tree than to have a small tree and more hit tests per pixel.
The default parameters for the BSP tree are set up for optimal performance on average hair, but it is the user's responsibility to balance these parameters to get optimal offline (pre-render) and online (during render) computation speed.
It is a good rule of thumb to set the minimum size for each leaf to be 10-20 pixels in screen area, and to restrict the number of segments per leaf to be 0.1-0.2% of total segment count. Note that segments can be computed based on view (hair will get more detailed when its closer to the camera and less detailed when its father away) and therefore the settings can be based purely on an educated guess.
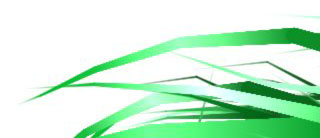
Hit radius option off (left) generally good for thin strands but bad for thick strands (artifacts). Solution: Turn on hit-radius testing (right)
Other BSP options allow you to control how each BSP node chooses which segments belong to it and also how each hit test is performed. For example if you have strands that are generally less than a pixel in size, it would be wise to have the radius hit-testing option off. That would significantly speed up BSP tree generation and artifacts are only visible if strands are more than one pixel in width.
Also, if you have relatively small strands you can limit the raytracer from testing the distance from edges of segments. That way the edges will not be round (ie. projected primitive will look like a rectangle instead of a capsule) but calculation will be faster.

Raytracing using rectangle (left) and ellipsoid/round-edged (right) primitives
Tip: lf your hair appear too dim, try playing with self-shadowing coefficient or turn it off completely.
Parameters
- Global radius, thickness map
Control the global thickness of hair. If you wish for every hair to have its own thickness settings, use a render settings modifier. - Back-facing hair occlusion
If on, all hairs facing away from the camera will be excluded from render thus saving time and memory. This option is generally good for fur and shorter hair as it usually decreases render time by 1/3 with default settings. However using it on longer hair can cause hair 'popping'. - Hair occlusion start/end
To prevent hair 'popping' the occluded hairs are gradually faded away instead of just disappearing. Start controls the angle (relative to camera) when fading start, and end controls when hair is fully occluded. A value of 0 means hair is perpendicular to the camera. A value of -1 means that hair is facing directly towards the camera, and value of 1 means its facing directly away. - Leaf segments, size, max BSP depth
Control how far the BSP tree is allowed to split itself. Read the explanation on BSP trees above for more details. - Alloc. nodes
To prevent memory from being constantly manipulated and to speed up building of BSP, this value controls how much memory is initially allocated for it (measured in BSP nodes). - Round segment corners
When on, segments will be rendered as ellipsoids, otherwise they will be rectangles. Note that rectangles are faster to ray trace than ellipsoids (see example above). - Hair radius hit testing
When off, only one segment entry per BSP node is allowed thus speeding up the render. This is ideas for thin hair strands that usually can intersect one node at a time with their radius. However it can also cause artifacts for close-ups and thick strands (see example above). - Self-shadowing coefficient, map size, filter kernel
These options are described in Ornatrix Shadow Maps help. If on, self-shadowing will be computed internally for all ray traced hair (see render at the top of this file). Note that when using deep shadow maps even if this option is on, self-shadowing will be ignored. - Receive shadows
When on, shadows from external lights will be taken into account by shaders.