 Hair Shape
Hair shape is a Maya shape node which represents renderable Ornatrix Hair inside a scene. It is usually the final result of one or more operators inside a hair operator stack.
Parameters
Some attributes of a hair object can be customized such as the way it is displayed in the viewport or which information it exports to renderers. These parameters allow customizing this behavior.

Viewport Hair Display
Parameters in this category allow controlling how the hair is displayed inside the viewport.
- Hair Display Type
Specifies the way that the current hair shape is rendered in the viewports:- Legacy
Hair is displayed as a mesh. This allows visualizing the hair's width and texture properties. - Optimized
A special variant of hair mesh display which employs numerous optimizations such as GPU buffer reuse to improve the performance over Mesh method by over 4 times. - GPU Hair (Default)
Fastest option where a special GPU program shader is used for generating and drawing hairs. This option also allows selection, group, and channel overlays (see below).
- Legacy
- Camera Facing Hair
When this option is activated, the hair strands normals will follow the camera, giving you a better representation of the hair in the viewport. - Camera Facing Normals
When on, all hair normals will be aligned to face the camera. This is useful for a better quality display of short fur. - Display strand selection
When on, strand selection overlay display is always visible in viewport, even if Edit Guides operator node is not currently selected. - Display strand groups
When on, strand group overlay display is always visible in viewport, even if Edit Guides operator node is not currently selected. - Display overlay opacity
Specifies the amount of color blending done when displaying overlaid selection, groups, or channels. 0 disables overlay and 1 fully fills in overlaid strands with color. - Overlay blend mode
Specifies how strand color overlay is blended with the strand shading - Display strand channel overlay
Selects a strand channel whose values will be overlaid on top of shaded hair colors, or turns strand channel display overlay off
Renderer Export
Renderer Export rollout in the Attribute Editor provides the ability to select specific strand data channels to be exported as render shading attributes. Render shading attributes can then be used with individual renderers like Redshift to color and otherwise shade the hair using the exported data.
Adding a render attribute
To add a new render attribute:- Select the type of render attribute you want to create. At the moment the two options are scalar and color.
- Press the + button on the right
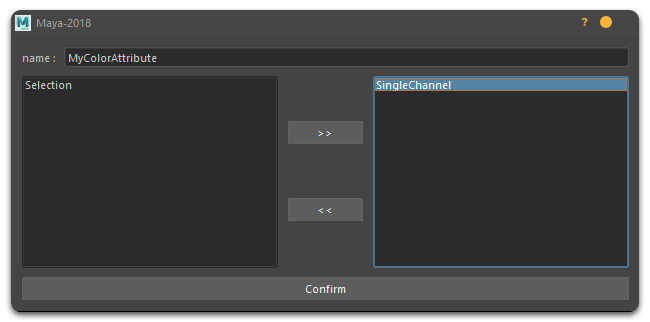
- Enter a desired name for the attribute. This name will be used to reference this attribute inside the shading pipeline.
- Select one or more existing strand channels from the list on the left and add them to the list on the right using the >> button. You can use the << button to remove the channels. The number of channels will determine the number of components which are exported. Exporting a single channel will export greyscale values. Exporting 3 channels will export RGB values. You are not limited to the number of components you can export. The order of the channels is important since it will map to the R, G, B components.
- Press Confirm to create the render attribute.
 |
In this you can see this workflow in action |
Removing render attributes
To remove a render attribute press the X button next to it.