 Hair from Mesh Strips
- Hair from Mesh Strips
- Scripting
Overview
Hair From Mesh Strips object allows you to use flat or cylindrical polygon meshes to generate hair along their surface. Hairs are generated from one edge of a mesh strip towards the opposite edge. The edge from which the hairs start growing can be specified manually per each strip, however, the hairs will be generated along the longest boundary of a mesh strip by default.
The polygon strips can be deformed, moved, or edited inside the scene and the Hair From Mesh Strips object will automatically adapt to these changes. You may use multiple strip objects, have one strip object with multiple strip elements, or have a combination of these options.
Videos
|
Introduction to Hair from Mesh Strips |
Modeling character hair with Hair from Mesh Strips |
|
Hair from Mesh Strips overview in Spanish (English subtitles) |
Creating Hair From Strips
To create hair from strips select one or more mesh objects inside the scene and then click the Hair from Mesh Strips button on Ornatrix shelf.

If you add more strip objects inside the scene you can click on Add Strip Mesh button and select the object. Once strip hair is generated you may use any other procedural modifiers such as Curling, Render Settings, Frizz, and others for refining its shape.

Removing Strips
To remove hair strips:- Select the Hair from Mesh Strips operator in the hair operator stack
- In Attribute Editor scroll down to find the list of hair strips
- Select the strip to remove and click the Remove Strip Mesh button
Strip Mesh Requirements
The polygon meshes defining the hair strips must meet a few requirements to properly generate hairs:
- The strip mesh cannot contain triangles, especially not along any of its boundaries
- It is highly recommended that the strip mesh have four boundaries. This means that there are a total of four edge loops going along the circumference of the strip mesh.
Modifying Strip Meshes
After you have added one or more strip meshes into the hair from strips object you may use standard Maya deformers and nodes to edit them. The editing can include both geometrical and topological changes. If you change the mesh topology, however, please make sure that you do not break any aforementioned mesh requirement rules.
Strips Editing Mode
Editing Mode allows you to select individual strips. Any changes to orientation of the strips will only be performed on the currently selected strips. The arrows at the tips of the strips indicate which direction strip hairs will be generated.

Selecting strips
Once in strip editing mode you should see a base, direction, and tip arrow lines for each strip in the viewport. You can select strips by clicking on these line indicators using single or drag selection.
You can use Maya's selection modifiers keys (Shift and Ctrl) to add and subtract from selection.
Rotating strips
Once you select one or more strips you can rotate the direction in which the hairs are generated along them. Press the Rotate Strips button to rotate the selected strips. Use the Direction drop down to specify how you want to change the orientation of the hairs on the strips.
Changing per-strip parameters
Once you have selected one or more strips you can change their specific parameters by modifying the values in the Selected Mesh Strip Settings group of the Attribute Editor.
Resetting per-strip parameters back to global values
If you wish to reset parameters of specific strips back to the global values select the strips in question and use the Reset button next to the respective parameter inside the Selected Mesh Strip Settings group of the Attribute Editor.
Parameters
Hair from Mesh Strips operator contains two sets of configurable parameters: global and local. Global parameters will apply to all strips by default. Local parameters can be specified for specific strips to override their properties. You can always reset the local parameters for a strip to revert back to using the global parameters instead.
Global parameters can be found under the general Hair from Mesh Strips Settings group of the Attribute Editor. Local parameters can be found under the Selected Mesh Strip Settings group found lower in the Attribute Editor window.
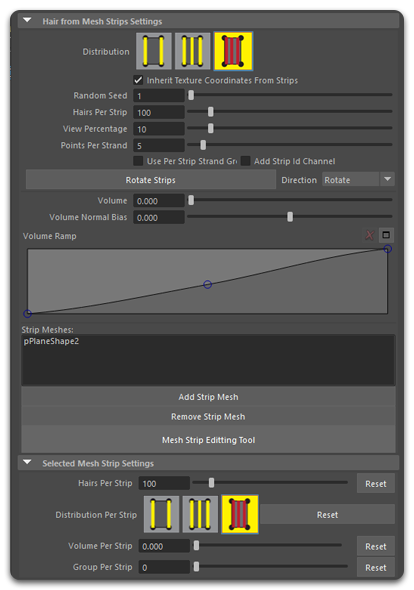
Distribution
Specifies how hairs are distributed on a mesh strip. There are three options:- Vertex Distribution: Hairs are generated per each boundary vertex on the strip. Thus the number of hairs depends on the strip mesh's boundary edge vertex count. The Hair Count parameter has no effect when this option is used.
- Uniform Distribution: Hairs are generated at equal distances from one another.
- Random Distribution: Hair are generated randomly along the strip's boundary edge.
This parameter can be set globally as well as per-strip.
Random Seed
Determines the randomness of the generated hairs on the strip when Random Distribution is used. Also affects other random parameters of the hair strips such as the Volume randomization.
Hairs Per Strip
Specifies the total number of hairs to generate inside mesh strips when using Uniform or Random distributions. This parameter can be set globally as well as per-strip.
View Percentage
Specifies the percentage of Hairs Per Strip value which will be displayed inside the viewports. This allows the render version of the hairs to be much denser than that used in the views, thus allowing quicker preview while you are working inside the scene.
Points per Strand
Specifies the number of points to generate along each hair strand. The bigger the value the more segments each hair will have.
Use Per-Strip Strand Groups
This option will create a Strand Group from each hair strip. Those groups can be used in any other operator and will be preserved when adding a Guides From Hair operator on top.
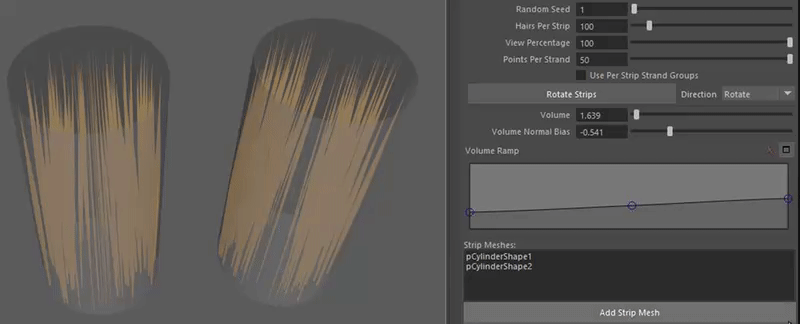
Volume
Use this value in conjunction with the Volume Ramp to offset hair points perpendicular to the strip mesh surface. This allows to add some volume to what are otherwise flat strip meshes. The hairs will be offset using this value randomly while respecting the ramp curve you specify.
This parameter can be set globally as well as per-strip.
Volume Normal Bias
Set this parameter to a negative value (-1) to have the hair volume be generated entirely inside the cylinders.
Group Per Strip
Allows specifying a strand group for the selected strips. These strand groups can then be used to allow specific operators to only affect the strips in question.

Add Strip Id Channel
When on, a per-strand channel containing each hair's source mesh strip id will be created
Scripting
The following MEL commands are available for this operator:
/* Rotates the currently selected strips using specified method.
Method can have one of the following values:
0 - Rotate
1 - Flip
2 - FlowDown
3 - FlowUp
4 - FlowLeft
5 - FlowRight
6 - FlowBack
7 - FlowForward
8 - TextureFlowDown (Texture coordinates in decreasing V direction)
9 - TextureFlowUp (Texture coordinates in increasing V direction)
10 - TextureFlowLeft (Texture coordinates in increasing U direction)
11 - TextureFlowRight (Texture coordinates in decreasing U direction) */
OxRotateMeshStrips( string $shapeObject, int $rotateMethod )