Adding Hair to Objects
Overview
Ornatrix allows you to add hair to objects in two different ways: The Groom Preset system and the Create brush context. Both methods provide the right tools to quickly generate hairs on a character.
Adding Hair from Presets
Once Ornatrix Maya has been installed, start Maya and find the Ornatrix tools in the Ornatrix shelf. Use Add Hair to Selection option with an object selected and choose a hair preset as starting point. Different hair presets options are provided depending on the selected object(s). For instance, you can add hair to polygon meshes or to NURBS curves.
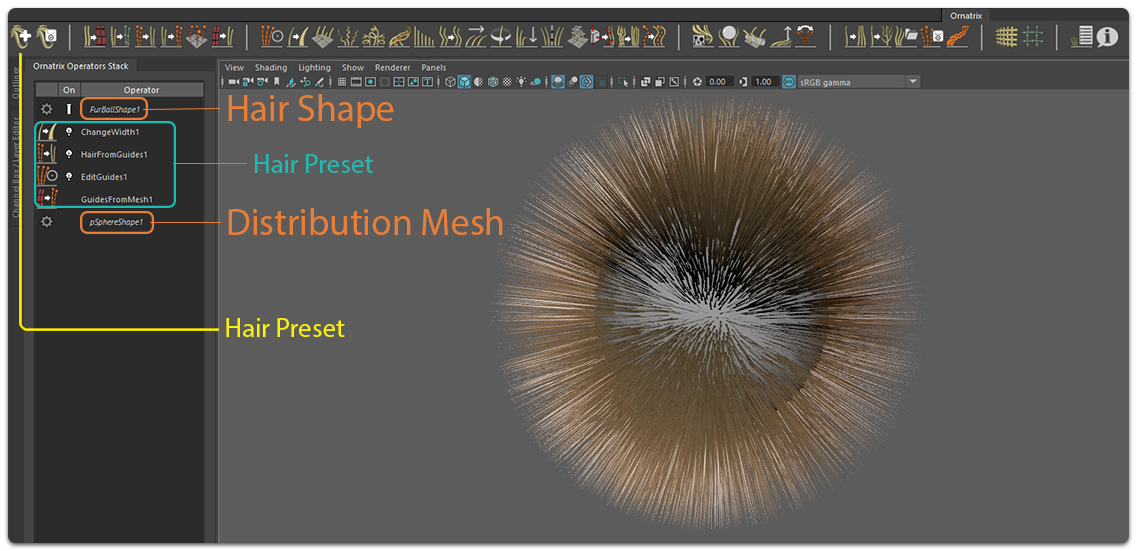
Hairs on a polygon mesh
When using a mesh to generate hair, six operators will be added to the hair stack. From bottom to top:- The first operator represents the shape used to generate the hair guides, this is the distribution mesh.
- Guides from Mesh scatter guides on the distribution mesh.
- Edit Guides Operator is used to edit and brush the guides generated by Guides from Mesh modifier or to sculpt the hair strands when used on top of Hair From Guides operator.
- Hair from Guides distributes and interpolates the hair following the guides previously generated.
- Change Width sets the thickness and shape of the hair strands.
- The last operator on top represents the shape used to generate the groom. This object represents the final result after the hair operator stack has been computed.
Hairs on NURBS curves
When using NUBRS curves to generate hair, three operators will be added to the hair stack. From bottom to top:- The first operator represents the NURBS curves shape used to generate the hair guides.
- Guides from Curves generates one hair guide for every NURBS curve.
- Ground Strands attaches the generated guides's roots to a polygon mesh for hair distribution and interpolation with Hair from Guides.
- Change Width sets the thickness and shape of the hair strands.
- The last operator on top represents the shape used to generate the groom. This object represents the final result after the hair operator stack has been computed.
See Hair from NURBS Curves for more details.
Note: Visit the Groom Preset documentation page to learn more about creating, storing and sharing hair presets.
Adding Hairs with the Create brush
The create brush allows you to add individual hair strands by clicking on a polygon mesh or scatter multiple hair strands or guides at once. This brush can also be used as a substitute for the Plant Guides tool in Edit Guides operator.
To add hair to a polygon mesh using the create brush, find the Create tool in Ornatrix shelf, activate it and click or click and drag on a polygon mesh to plant or scatter hairs on it. If the clicked polygon mesh does not have a hair object connected to it, one will be added automatically the first time you use it.
| Using the Create brush tool to scatter hairs on a mesh |
Note: Visit the Grooming Tools documentation page to learn more about the Create brush.