Graft Grooms
Graft Grooms are a special type of preset for creating hair on top of a surface by placing a pre-made graft surface which then generates the resulting hair. A graft groom can contain a set of parameters which can be adjusted to further refine the look of the hair.
Grafting a groom
Grafting a surface
The first step to create a graft groom is to select a graft surface. To do so:- Click the Graft Groom icon on Ornatrix shelf
- From the list of displayed surfaces select one by clicking on it
- Click and drag on top of the target mesh surface inside the viewport to "fit" the graft surface.
- Pressing Escape key during the drag will cancel the graft surface fitting
The default graft groom for the selected surface will be created when the drag operation is completed. Making further drags on the surface will re-place the graft surface again
Refining grafted surface placement
Once a graft surface is placed onto a target mesh you can select graft surface vertices. Selected vertices can be moved along the surface of the target mesh top adjust the shape of the graft surface. Soft-selection parameter in the tools setting can be used to increase or decrease the influence range of the selected vertex. The resulting groom will conform to the changes made to the graft surface.
Grafting another surface
To start creating another graft surface, without modifying the last placed one, first deselect the created graft groom in the viewport or the Outliner. Then repeat the steps of placing a graft surface to create a new groom.
Changing grafted groom parameters
Once a graft surface is placed the resulting groom is selected. Its parameters can be adjusted in Maya's attribute editor.
Creating Graft Grooms
The process of creating new graft grooms can be performed entirely within Ornatrix. Indeed, the grooms which ship with Ornatrix were also created this way. There are a number of steps involved such as creation of the graft surface and subsequent grooms for it.
To create a graft groom:- Select all operators in the operator stack (except from the base surface and the shape node)
- Right click and Box the operators into a single Groom operator
- Select the top shape node and press the Generate Groom button on the left side of Ornatrix shelf
- If done correctly, Create Graft Surface or Update Graft Surface checkbox should be enabled and checked. This indicates that a graft groom rather than a normal groom preset will be generated.
- Fill in the optional information, it is described below
- Press the Generate button
The new graft groom should be now inside the grooms directory. If a new graft surface is defined it will also be written into the grooms directory as a file with oxgs extension.
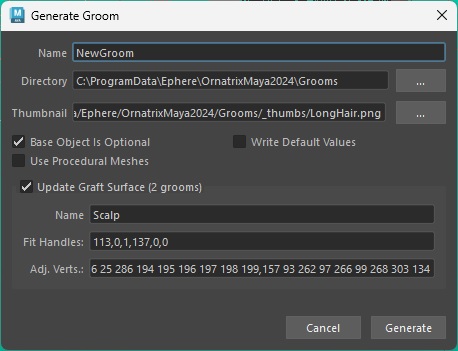
Generate Groom parameters
The parameters inside the Generate Groom dialog are the same as the ones used for creating grooms. When graft grooms are created the Create Graft Surface or Update Graft Surface checkbox will be enabled (see above). If this option is unchecked then a normal groom will be generated instead.
- Name: Name given to graft groom
- Directory: Directory where the groom file will be stored
- Thumbnail: An optional 64x64 pixel PNG file defining the thumbnail displayed for the groom in the UI
- Create Graft Surface: If checked, a new graft surface definition file (oxgs extension) will be created in the target grooms directory. If the surface was previously written for another groom, Update Graft Surface (N grooms) will be shown instead. N is the number of grooms already using this surface. For organization reasons we encourage reusing the same graft surface many times.
- Name: Name of the graft surface to assign or modify
- Fit Handles: Coordinates of two fit handles which will be used create the graft surface in format: handle1Face,handle1UCoord,handle1VCoord,handle2Face,handle2UCoord,handle2VCoord
- Adj. Verts.: A set of collections of vertices which will act as adjustment groups. The groups are comma-separated and the vertices within a group are space-separated. Format: group1vert1 group1vert2 group1vert3, group2vert1, group2vert2, group2vert3...
Preparing a graft surface
Graft surface is the base mesh which can be fitted onto an other mesh, such as a character model, and which generates hairs comprising the grafted groom. The best practice is to use an existing model, such as a character's head, to extract just the part of it which will be involved in creating the groom. Only the localized part required to place the groom's hairs is needed. As such, it is best to select the faces of the graft groom from the overall model and delete the rest of the mesh's faces.
Thumbnail image
It is a good practice to also take a screenshot of the graft surface inside the viewport, crop the resulting image to 64x64 picels, and save it as a .png file into Ornatrix' grooms directory.