Simulating Cloth
Overview
Lucid has a number of basic and advanced options for simulating cloth to be used in a variety of situations. It is very easy to create basic simulations such as a waving flag or a table cloth but it is also possible to simulate garments and deforming clothing on a character. Destructive effects like tearing can also be added and either driven by internal forces within the cloth object or specified artistically through maps.
Creating cloth simulation
There are a number of ways to make a specific scene object act as cloth in Lucid simulation. You can use the Lucid toolbar or the main menu to quickly add cloth preset, or you can set up the Lucid modifier on your object manually. For batch setup of many cloth objects you can also use Particle Flow Geometry Operator to add objects with Cloth body type.
The mesh used for cloth simulation must be normalized and not contain invalid, isolated vertices. If your scene geometry consists of multiple non-connected meshes, each of the meshes will be simulated separately. For example, the 3ds Max teapot primitive will have its body, snout, and lid components simulated as three separate cloth objects.
With Lucid toolbar
- Select your object
- Click on the Cloth, preset in Lucid toolbar
Manually
- Select your object
- In the modifier stack add Lucid Modifier
- Set the Material Type to cloth
You are ready to simulate.
Fixing cloth vertices
In many scenarios it is important to have some part of the cloth geometry be attached to something inside the scene. For example, a waving flag will need to have some of its parts attached to the pole, a cape might be attached around a character's neck, and so on. The parts of the cloth mesh which are attached might be animated manually or connected to 3ds Max geometry which is deforming in some way.
|
Fixing cloth vertices in place |
Animated cloth fixation (Begin at 55sec) |
To specify which parts of the cloth are to be attached select the vertices of the cloth geometry passed into the Lucid modifier using an Edit Mesh or Mesh Select modifier. The selected vertices will not be simulated by Lucid and instead their positions will be used to constrain the movements of the rest of the mesh.
Simulating tearing
An important effect which can add realism to cloth simulations is tearing under stress. For example, you might create a simulation of a Hulk character growing in size and have the cloth be ripped apart as the body size changes. To simulate tearing simply change the Tearing parameter in Lucid modifier to above 0. The larger this value the easier it will be to tear cloth. Cloth will only tear in places where sufficient stretching is applied either due to its own weight or due to collisions with external objects. A value above 0.9 is typically needed to produce tears.
|
Cloth tearing tutorial |
Controlling cloth tearing (Begin at 4:45) |
You can also specify which parts of the cloth can tear easier than others by using a monochrome map. Simply add a map to the Cloth Tearing parameter. It will act as a multiplier to the aforementioned Tearing parameter.
Using the Split Decision, Left Count, and Right Count parameters you can disallow cloth vertices adjacent to each other from being torn. This can create realistic looking effects such as strands of cloth being left un-torn. Use the Select Torn Vertices parameter to make Lucid select the vertices which have undergone tearing. You can apply another modifier like Tessellate on top to further process these areas of the cloth.
Handling collisions
In most of the simple cases you should use static and convex collisions when possible since these will maximize performance of the simulation. However, if you are simulating cloth over a deforming character mesh you will need to use Signed Distance Field collision type on your character's mesh. Read about collision objects for more information on how to perform this setup.
Note about resolution
When using Lucid's cloth simulation a particle will be generated at each vertex of your cloth mesh. The size and number of particles have a big effect on the behavior of the overall simulated cloth. Therefore, as a part of your parameter adjustment process please take into consideration adjusting the detail of your source cloth mesh.
If you have denser topology in your cloth mesh then the number of particles and connections between them will grow. This will allow cloth to be become softer and bendier. It will also take more sub-steps to be able to preserve rigidity of the material so that parameter may need to be adjusted.
Parameters
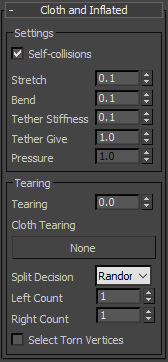
Stretch
Controls how much the cloth is allowed to stretch. Bigger values will produce more rubbery results. Small values will make the cloth rigid and non-stretchable.
Bend
Controls how much the cloth is allowed to deform. Bigger values will make the cloth more rigid but enforcing more rigidity. Smaller values will make the cloth more soft and silk-like.