 Guides from Mesh
Guides from Mesh operator allows for creation of guide hair based on a polygonal mesh shape in a Maya scene. Distribution parameters can be tweaked to get different distribution types. This operator goes through the mesh and "plants" roots onto it. It then extrudes guides from every root based on the surface normal at the root origin.
The user also has an option to plant guides only in certain areas on the mesh. These can be assigned either with a material ID or using a distribution map. Although this isn't necessary since hair from guides is usually what ultimately defines the final result, it is usually a good idea since you do not need to edit guides which will not be used in the end. You may also apply guides to only selected faces on the mesh.
One of the undefined parameters is the guide twist. Because hair is cylindrical in its structure twist is usually not important. However, when you are dealing with feathers or proxy meshes later on twist becomes of significance. By default hair twist is generated such that its global orientation is constant. However, when surface starts deforming the twist can change because hair's global orientation changes. To combat this, there is an option to orient every strand based on underlying surface topology rather than a global direction.
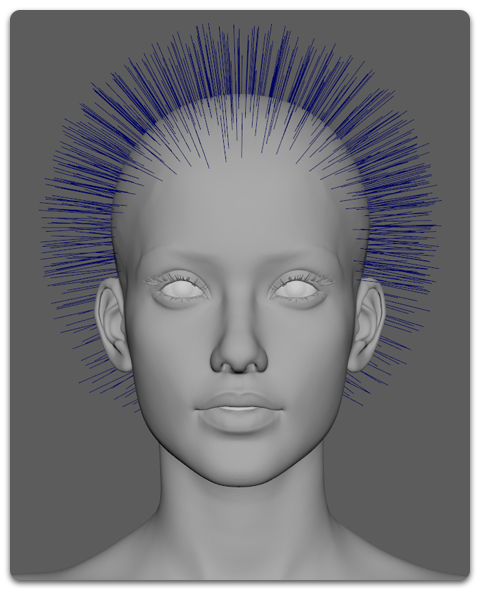
Guide Hair generated using Guides From Mesh
Parameters
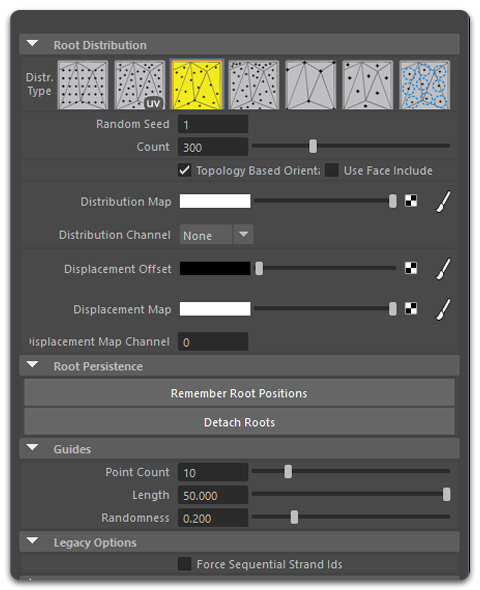
Root Distribution
Use this group to control how guides are grown on the surface.
- Distribution Type
There are several distribution methods for spreading hair roots along the surface:- Uniform
Roots are placed in a linear manner forming a 'grid' around the mesh. This can be useful while creating brush patterns where hair has been planted artificially. - Random (UV-based)
Same as area-based approach, except this time instead of calculating area for every face, UV area of faces is calculated. This allows user to control the distribution by maintaining UVW coordinates on the mesh. It is possible to unwrap a character, for example, and have dense placement of hair in some spots than the others by stretching out those areas in the UV editor. - Random (area-based)
Roots are created randomly, and the amount of roots per face is calculated based on the total area of all faces on the mesh. Therefore all roots will be distributed evenly and randomly throughout the mesh. You can control the random factor through the seed value. Same seed values will produce similar results. - Vertex
One root is generated at each vertex of the surface mesh - Random (per-face)
Same as above, except the amount of roots per face is the same for every face on the mesh. Therefore larger faces will tend to have sparser root placement, while smaller ones will have roots more clustered in one spot. - Face Center
Roots are placed at the center of each polygon face or triangle. - Even
Roots are placed on the surface randomly but at the same distance from one another. This method provides the most realistic root placement result for natural hair phenomena.
- Uniform
- Random Seed
Change this value to shuffle the positions and random lengths of the resulting guides. - Count
Sets the total desired number of guides. The actual guide count does not have to match this number exactly, especially if a distribution map is used. - Use Material ID
When true guides will be only generated on faces which have shader with specified index assigned to them - Material ID
Use in conjunction with Use Material ID option. Specifies the index of shader on faces where guides will be generated. All faces not containing this shader assignment will not have guides generated on them. This option is only useful if you used face component selection to assign different shaders to different faces of the distribution surface. - Use Face Include
When on guides will only be generated on selected faces. This option will only have an effect if some face components were selected when current Guides from Mesh operator was added. - Topology Based Orientation
When on the rotation of guides will be "glued" to the distribution mesh. Rotations will be computed relative to the orientations of mesh edges and thus properly react to deforming geometry. When off, the rotations will be calculated in global scene coordinates. - Distribution Channel
Allows you to specify vertex color set on distribution surface which controls the guide density over the mesh. - Distribution Map
An optional multiplier map for guide density on the surface. - Displacement Offset
An optional offset along surface normals of generated guides. Allows you to push away guides from the surface if needed. - Displacement Map
An optional surface map multiplier for the Displacement Offset parameter. Use to vary displacement along the surface with a texture map. - Displacement Map Channel
Index of UV color set of distribution surface to use for Displacement Map parameter. Leave 0 if not sure.
Root Persistence
Parameters in this group allow for caching guide positions and making sure that guides remain constant.
- Remember Root Positions
When this option is used the root positions generated by this operator will be cached and saved with the scene. This can ensure that you can send the same scene to other computers and render it without the risk of roots being generated in different places causing them to "jitter".
Use this option after you have set up the guides to your liking. It is a good idea to turn this button on before proceeding with editing the guides. When this option is on changing other distribution parameters will not have any effect.
When you turn this option off the guides will be regenerated using current distribution parameters. - Detach/Attach Roots
Turning on Detach Roots parameter will store the positions and twist rotations of current guide roots inside the operator until the roots are re-attached. When this parameter is turned off (Attach Roots option) the stored positions will be re-projected onto the distribution mesh surface.
This allows to change the topology of the distribution mesh while retaining the guide information. It is especially useful if some changes are done on the guides higher in the operator stack, such as with Edit Guides operator. Temporarily detaching, changing mesh topology, and re-attaching the roots can preserve any changes done to the guides.
Before detaching the guides, Remember Root Positions option must be turned on. If this is not done manually this option will be turned on automatically. This is needed because the roots must be locked/cached before they can be detached. Likewise, if you turn off Remember Root Positions option the detached guides will be automatically cleared.
Guides
Parameters in this group control how the actual guides look like.
- Point Count
The number of vertices to generate for each guide. The more vertices the more detail the guide shape can have. - Length
The length of generated guides. - Randomness
Randomizes the length of generated guides by some fraction. 0 means no randomness. 1 means that length will be completely random from one guide to another up to the Length parameter.