 Surface Comb Operator
Surface Comb node is designed to procedurally define the shape and orientation of character fur along a surface. It can be used to style large number of hairs at a macro level by using directional vectors to specify their flow and a curve to define their shape relative to the distribution surface.
Workflow
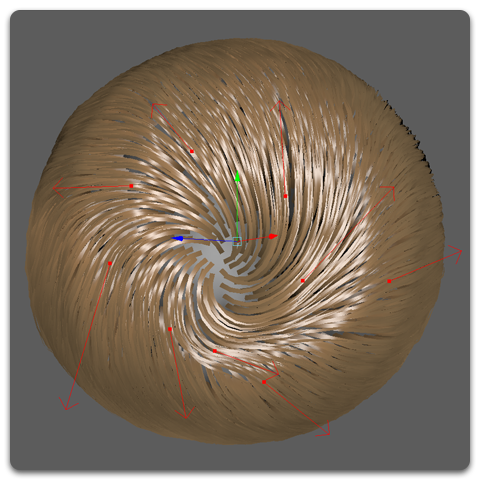
When Surface Comb operator is added you will not see any changes on your hair object until you start adding Sinks. These are arrows that you can draw on the surface mesh to direct the hair along the surface.
Creating sinks
Use the Edit Sinks tool to add and edit sinks. This tool is located in the Ornatrix shelf.
With the tool activated, click and drag on the character's surface mesh to draw an arrow on the surface, this arrow will be used by the Surface Comb operator to deform the hair depending on some user defined properties. The using the Edit Sinks tool a new Surface Comb operator will be added automatically to the hair stack if none exist. You can see the changes in real-time as you drag the arrow across the surface. Add as many sinks as needed to define the desired hairstyle or fur.
Editing Sinks
To edit your sinks open the Tool Settings window to find all the settings for the tool and activate the Edit Mode option in the Sink Editing Settings section. When in Edit Mode, you can either click at the sink root to modify the overall sink position, or the sink arrow tip to modify its direction.
 |
Using Sinks with the Surface Comb operator |
Move Along Surface
Move Along Surface option (on by default) controls how the sink directions are edited in viewport when dragging the sink tip manipulator handle. When this option is on the sink directions will always stay parallel to the mesh surface at the point of sink's position. When it is off the sink direction handle can be freely moved in 3 dimensions. It is useful to be able to freely edit the sink direction when creating detailed grooms with surface comb.
Per-sink slope ramps
Sinks properties can be modified in a per-sink basis. You can edit all sinks properties thought Maya'sTool Settings window while the tool is active. In the Tool Settings window you will find all the global properties for sinks. If you click a sinks and select it you will be able to change its individual properties like Sink Type, Mirror Axis, Sink Group and Slope Curve. While the Slope Ramp parameter allows specifying the shape of the strands globally it is also possible to specify the shapes for individual sinks.
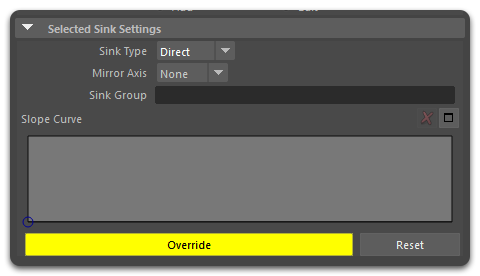
To specify the slope shape for a specific sink first select it and then press the Override button in the Slope Ramp Override group of the Attribute Editor. You can now expand and modify the ramp to affect the selected sinks.
Due to some limitations the ramp control might not refresh its visual appearance after sinks are selected. This is benign, however, and you can get visual feedback as soon as you start editing the ramp.
To revert selected sinks back to using the global slope ramp use the Reset button.
Deleting sinks
To delete a sink switch Mode option to Edit and press Sinks Editing Tool button. Then select the sinks which you want to delete in viewport and press the Delete button on keyboard.
Parameters
- Strand Group
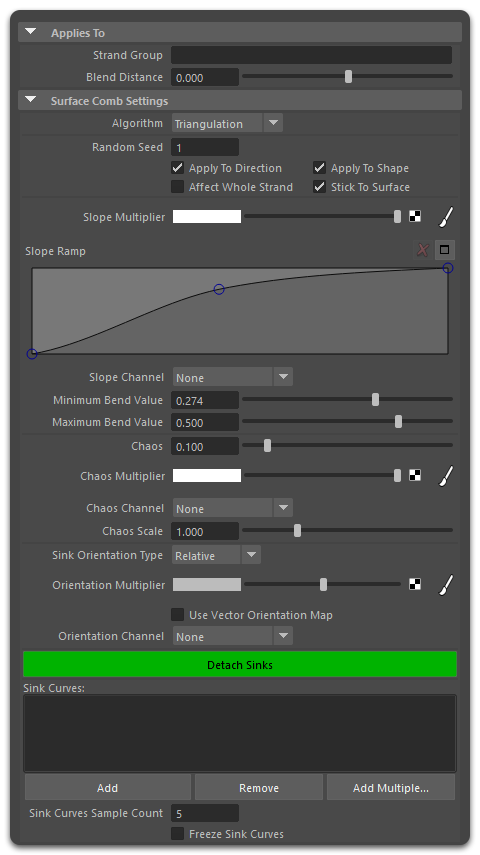
Specifies to which hairs this operator will be applied. Hairs not belonging to specified strand group will be ignored. - Algorithm
The algorithm used to compute surface combing.- Triangulation
Legacy way of calculating strand shapes from sinks. Each surface mesh vertex is assigned direction and sink associations based on its proximity to the sinks. Strands then use their surface dependency information to interpolate the strand's direction and shape information. This method is faster but generally only works well for short fur. - Mesh Vertex
Recommended method. Information about strand directions and shape is calculated directly from nearby sinks. Sinks can also control the lengths of strands. This way works better for longer hair.
- Triangulation
- Random Seed
A randomness value to apply to parameters such as Chaos. - Apply to Direction
When turned on, this operator will change the hair direction along the surface using specified sinks. When off, direction of incoming hair will not be changed. - Apply to Shape
When turned on, this operator will modify the shape of hairs using the Slope Ramp. When off, shape of incoming strands will be preserved. - Affect Whole Strand
When checked the whole strand is oriented. - Stick to Surface
When on, the strands will always follow the surface. Otherwise, they will attempt to follow sink direction. - Slope Ramp
Controls the bending of hair strands towards the distribution surface. - Slope Multiplier
Allows using a texture map to vary the amount of Slope (bending towards surface) of hairs along the surface. - Slope Channel
Allows using a guide channel to vary the amount of Slope (bending towards surface) of hairs along the surface. - Minimum Bend Value
Starting angle for bending the strands with -1 being opposite of surface normal. This parameter with the next one control how the hairs are bent relative to the surface. - Maximum Bend Value
Ending angle for bending the strands with -1 being opposite of surface normal. - Chaos
The randomness of direction. The bigger this value the more random combing direction will become relative to the user-defined sinks. - Chaos Scale
Frequency of randomness added added to strand directions along the surface. - Chaos Multiplier and Channel
Control this parameter using a per-strand or per-root channel. - Sink Orientation Type
Controls whether strand orientation is changed locally or globally relative to the whole object - Sink Orientation Multiplier and Channel
Allow to vary the sink's angle relative to the surface using a texture map or a strand channel. - Use Vector Orientation Map
When this option is on the values in orientation map will be interpreted as object-space vectors to direct the hair. Otherwise, the values will be interpreted as rotation angles in radians relative to input strand's surface rotation. - Hide Back-Facing Sinks
When on, sinks facing away from the view will not be displayed. Used to reduce visual clutter.
Sink Curves
It is possible to add one or more external Maya NURBS curves to define sinks within a Surface Comb operator. When this is done the hairs will be oriented in such a way as to follow the direction of the specified curves.
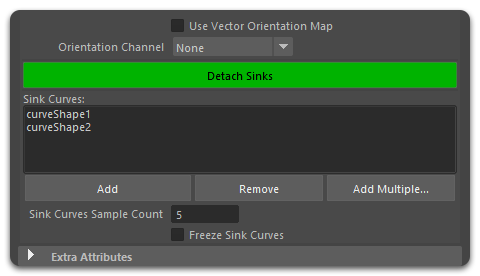
- The curves list shows currently present external curves
- Add button allows you to pick a curve from the viewport to add to the external curves list
- Remove button deletes the currently selected curve from the external curves list from the operator
- Sink Curve Sample Count
Specifies how many samples to get from the external curves. The more sample points the more detail will be transferred into the hair flow. - Freeze Sink Curves
When checked the curves will be locked in their current state and not respond to changes of their referenced external curves.